What is a Macro? Macro is one of the objects of Microsoft
Access database that is used to create actions that run sequentially i.e. in
the order in which those actions are listed and they are of two types: Embedded
and Standalone macros. Macro is used to add logic to your database and to automate
repetitive tasks and to create more usable interfaces like the switchboard and
other numerous tasks. Macros work hand in hand with Visual Basic and modules. In MS Access
2013 and above, you don’t really need an intense knowledge of Visual Basic
coding to create a simple macro. In this tutorial part, I will give you the
step by step guide of creating the various types of macros (embedded and
standalone) and also show you how to run and debug them.
This is part 1 of chapter 8 of the Free Online Access Tutorial Series at Microsoft Tutorial website. In this part, I will explicitly explain how you can create and run macro in any version of MS Office Access.
In the previous chapter (Chapter 7), I explained how to create professional reports, charts and mailing labels in any versions of MS Access in detail. Also see the full tutorial course content of this Microsoft Access Tutorial Series.
GETTING STARTED WITH MACRO AND ITS FEATURES
The term macro is often used to refer to standalone macro
objects (that is, the objects that you see under Macros in the
Navigation Pane), but in reality, one macro object can contain multiple macros.
In that case, it is referred to as a macro group.
A macro group is displayed in the Navigation Pane as a
single macro object, but a macro group actually contains more than one macro.
Of course, it is possible to create each macro in a separate macro object, but
often it makes sense to group several related macros into a single macro
object. The name in the Macro Name column identifies each
macro.
A macro consists of individual macro actions. Most actions
require one or more arguments. In addition, you can assign names to each macro
in a macro group, and you can add conditions to control how each action is run.
The following sections discuss each of these features in more detail.
Macro Names:
If your macro object contains only one macro, macro names
are unnecessary. You can just refer to the macro by the name of the macro
object. However, in the case of a macro group, you must assign a unique name to
each macro. If the Macro Name column is not visible in the
Macro Builder, click Macro Names in the Show/Hide group
on the Design tab.
Arguments:
An argument is a value that provides information to the
action, such as what string to display in a message box, which control to
operate on, and so on. Some arguments are required, and some others are
optional. Arguments are visible in the Action Arguments pane
at the bottom of the Macro Builder.
The Arguments column was introduced into
Access 2007, which allows you to view (but not edit) an action's arguments on
the same line as the action. This makes it a little easier to read your macro
because you no longer need to select each action to display its arguments. To
display the Arguments column, click Arguments in
the Show/Hide group on the Design tab.
Conditions:
A condition specifies certain criteria that must be met
before an action will be performed. You can use any expression that evaluates
to True/False or Yes/No. The action will not be executed if the expression
evaluates to False, No, or 0 (zero). If the expression evaluates to any other
value, the action will be run.
You can have one condition control more than one action by
typing an ellipsis (...) in the Condition
column for each subsequent action that you want the condition to apply to. If
the expression evaluates to False, No, or 0 (zero), none of the actions are
performed. If the condition evaluates to any other value, all of the actions
are performed.
Macro Actions:
Actions are the basic building blocks of macros. Access
provides a large number of actions from which to choose, enabling a wide
variety of commands. For example, some of the more commonly used actions can
open a report, find a record, display a message box, or apply a filter to a
form or report.
Temporary Variables
These three macro actions (SetTempVar, RemoveTempVar,
and RemoveAllTempVars) allow you to create and use temporary variables
in your macros. You can use these in conditional expressions to control running
macros, or to pass data to and from reports or forms, or for any other purpose
that requires a temporary storage place for a value. These temporary variables
are also accessible in VBA, so you can also use them to communicate data to and
from VBA modules.
Embedded Macros:
This gives you the ability to embed macros in any of the events provided by a form, report, or control. An embedded macro is not visible in the Navigation Pane; it becomes part of the form, report, or control in which it was created. If you create a copy of a form, report, or control that contains embedded macros, the macros are also present in the copy.
Standalone Macros:
From MS Access 2007 and later versions, a macro or macro group can be contained in a macro object (sometimes called a standalone macro), or a macro can be embedded into any event property of a form, report, or control. Embedded macros become part of the object or control in which they are embedded. Standalone macros are visible in the Navigation Pane, under Macros; embedded macros are not.
To Create a Simple Standalone Macro in MS Access:
1. Click Macro located
in the Macros & Code group the Create tab. This opens up the Macro Builder as shown below.
2. Add an action to the macro. For example, as a sales Manager,
you might want to create a macro that will automatically open a table in MS
Access and then automatically exports the table to MS Excel for you. To build a
macro carry out these function for you:
a. Click the Add New
Action drop down arrow.
b. Type the desired action or click the arrow to select from
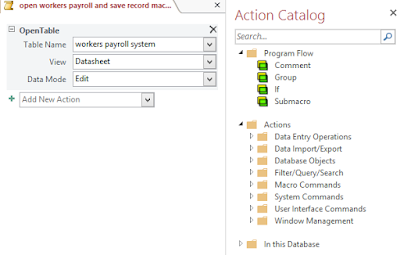
the list of available actions. For the above example, select the OpenTable action. Then click the Table Name fields and select the
desired table. Next, ensure that the View
and Data Mode is set to
Datasheet and Edit respectively as shown below.
The OpenTable action
above will open the table once the macro is run. Note that after selecting an
action, users must specify arguments for the action, if any are required.
c.
3. Next is to add an action that will export
the table from MS Access to MS Excel. Click the Add New Action drop down arrow and select the ExportWithFormatting action from the
drop down options.
4. In the Object
Type textbox or drop down menu, type or select Table or any other object of MS Access data base you wish to
export.
Next, select the particular table or type
the object name in the Object Name dropdown
menu. For example, the name of the table I want to export is workers payroll system.
Next, select your desired output file
format. You have many options available here like: Excel file format (“.xls”,
“.xlsb”, “.xlsx”), HTML file format (“.htm”, “.html”), PDF file format
(“.pdf”), Rich Text Format (“.rtf”), Text File format (“.txt”), XPS file format
(“.xps”). For example, since I want to export from MS Access to the most
current version of MS Excel, I will select the Excel Workbook (*.xlsx) option.
Next, select the Yes option from the Auto
Start drop down menu. This means that the ExportWithFormatting action will start as soon as you run the
macro. If you don’t want the action to start automatically, then select the No option.
Next, for the Output Quality drop down menu, you have two options to choose from:
the Print option and the Screen option. The Print option exports the file with a very high quality suitable for
both viewing on screen and for printout while the Screen option is only suitable for viewing on screen. So make your
choice. But I recommend the Print option.
The Output
file, Template file and the Encoding options or arguments are
optional. So leave them blank for now as shown below.
5. Please note that when you run the macro, Access carries out
the actions in the order in which you list them.
6. To add more actions, select an action from the Add New Action drop down menu and
provide the needed arguments for that action if any. Then save tour macro with
a unique file name.
To Run or Edit a Standalone Macro:
1. Right click the desired macro you wish to run from the Navigations Pane and select !Run. To edit a standalone macro in
design view, right click the macro name from the Navigation Pane and select Design
view as shown below.
To learn more about standalone and embedded macros in MS
Access 2007 and previous versions, See this article on Microsoft Office website on macro.
This is the end of part 1 of chapter 8 of this FREE online MS Access tutorial training series.
In the next part (part 2), I will give you the step by step guide on how to create switchboards and how to password- protect MS Access Database.
Recommended MS Access Textbook
Get this book (Kindle format): Designing Professional Database Management Systems Using Microsoft Access 2013 and 2016 and MySQL.
Click Here to know more about the book.In the next part (part 2), I will give you the step by step guide on how to create switchboards and how to password- protect MS Access Database.
Was this tutorial helpful to you?
Inform your friends about this post by clicking the share button below. Comment below if you are hooked up along the installation process.
Also click Here to subscribe for free so that you will get our latest game updates in your email.


No comments:
Post a Comment
WHAT'S ON YOUR MIND?
WE LOVE TO HEAR FROM YOU!