
Creating and setting up a new blog is very simple if you follow the steps by step guides in this tutorial article. You will learn how to create a new blogger account and how to setup and configure a professional blog and the necessary things needed with screenshots to simplify the whole process. Blogger.com is not the only platform to create a blog, but one of the advantages it has over other platforms like Wordpress.com is that it is completely free. You don't need a hosting plan. Note that before you can create and setup a blog in blogger, you must have an active gmail account because you be signed in to your gmail account before you can access the back end of your blogger blog.

This tutorial is divided into 2 parts or sections:


 The above robot.txt text tells Mediapartners-Google bot to not index "search" and crawl and index every other thing.


This tutorial is divided into 2 parts or sections:
- How To Create A Blog On Blogger.com Platform
- How To Setup The blog To Look Professional
Part 1: How To Create A Blog On Blogger.com Platform
1. Go to www.blogger.com and click on "Create Your Blog" as shown in the screenshot below. Ensure that you have a gmail account, else create one now before you continue.
Here are the 7 Things to Consider In Order to Build A Successful Blog/Website
Here are the 7 Things to Consider In Order to Build A Successful Blog/Website

2. Sign in to your gmail account. You may also create a new gmail for your blog with the intended domain name of your blog.
3. Next, you will be required to type your blog title and a unique blog domain name or address. Your blog title appears on the web browser tab of your visitors when they visit your blog. It also serves as your blog banner until you design and upload a site banner. You must type a unique blog address that is not in use, else you cannot continue.

Always choose generic names that looks professional and easy to remember. I don't advise you to use your name as your blog domain name. Also make sure that the custom version of your blog address is still free because you might want to buy it in future so that your blog address will no longer have the ".blogspot"extension.
4. Click "Create Blog!" when done.
Congrats! you have created a blog! But don't relax yet! You have to set it up and optimize it for search engines.
If you have a fully functional blog and wish to monetize it, check out this article on The 6 Legitimate Simple Ways to Make Money Online for Free
Part 2: How To Setup The blog To Look Professional
You just completed part 1. The next important step is to setup and configure your blog. You must set it up even before you start writing posts. Most of these setups are carried out under the Settings tab, Themes Tab and the Layout tab.
Here are some necessary Setups and Configurations you must set if you want your blog to grow fast:
- Adding Blog Meta Tag Description/Keywords
- Adding Custom Robot Texts
- Adding Basic Blog Descriptions
- Changing Your Blog Default Template
- Adding/Removing Blog Gadgets
- Adding Your Blog/Site Banner
- Adding A Custom Blog Favicon
Adding Blog Meta Tag Descriptions/Keywords
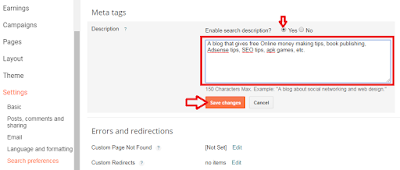
Meta tag descriptions contain your blog's main keywords. This keyword comes up when someone searches your blog on search engines. It should be the summary of what your blog is all about. Note that your meta tag description should not be more than 150 characters, else blogger will not save it.
Here is an example of a concise meta tag description of this website:
A blog that gives free online tutorials on MS Office packages, Online money making tips, book publishing, Adsense tips, SEO tips, apk games, etc.
To Add Meta Tag Descriptions/Keywords:
1. Click the Settings tab and then the Search Preferences sub tab.
2. Click on Edit under the Meta tag section. Select Yes to enable search description.
3. Type in your blog's meta tag description texts and click the Save Changes button as shown in the screenshot below.

Adding Custom Robot Texts
Custom robot texts tell search engine bots how to crawl and index your blog pages and blog posts. You can tell them not to crawl or index a particular page or some pages. Adding custom robot texts becomes necessary if you don't want some of your site pages to appear in search engines.
To Add Custom Robot Texts:
1. Click the Settings tab and then the Search Preferences sub tab.
2. Scroll down to the Crawler And Indexing section. By default, the custom robot.txt is disabled Select Yes to enable it. Then add the Following text to the text box:
User-agent: Mediapartners-Google3. Replace "bloggingtweeks" in the above text with your blog domain name and then click the Save Changes button as shown in the screenshot below.
Disallow:
User-agent: *
Disallow: /search
Allow: /
Sitemap: http://bloggingtweeks.blogspot.com/atom.xml?redirect=false&start-index=1&max-results=500

Adding Basic Blog Descriptions
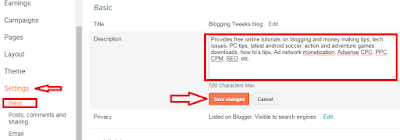
Your blog description is a write up that should not be more than 500 characters which contain all your blog keywords, both primary and secondary. It fully explains your blog, but it does not appear on search engines.
To Add A Basic Blog Description:
1. Click the Settings tab and then the Basic sub tab.
2. Click the Edit the Basic - Description and add your site's basic description. Make sure it is not more than 500 characters.
3. Click the Save Changes button as shown in the screenshot below.

Changing Your Blog Default Template
When you create a new blog, blogger assigns a default template. but most times, those default templates are not fully search engine optimized and also not user friendly. You can always change it to a customized search engine optimized and user friendly template. A blogger theme is always in ".xml" file format.
There are many sites that offer both free and premium SEO optimized templates. I recommend soratemplates.com for you. They have awesome blogger templates.
To Change/Restore Your Blog Template/ Backup Your Blog Template:
1. Click the Theme tab. You are always advised to always backup your blog templates, especially before you begin any customization on your blog so that if there is any mistake, you can simply reinstall the previously backed up template with all the settings and customization intact.
2. To backup your template: Click the Backup/Restore button located at the extreme top right hand side of the Theme page as shown in the screenshot below.

3. Then click on the Download Theme button as shown in the screenshot below. The theme with your current blog settings downloads in ".xml" file format. Copy it to a safe location in case of future use.
4. To change or upload a new template: click the Choose a File button and select the new xml template from your computer and then click the Upload button as shown in the screenshot below.

Adding/Removing Blog Gadgets
Gadgets or widgets are simple HTML and JavaScript applications that can be embedded in web pages and other apps, including Blogger. There are millions of gadgets available for use for blogs both in blogger and wordpress platforms. Each gadget performs a particular function. For example, the Popular Post gedgets show the specified range of numbers of most popular post articles in your blog or website. Some of the recommended gadgets you should add to your blog are:
- Popular Post gadgets
- Recent Posts gadgets
- Featured Post gadgets
- Tags/Labels gadget
- Pages gadget, etc.
To Add A Blog Gadget/Widget:
1. Ensure you are in the Layout page. Click the Add A Gadget link in the section of the template you want it to appear. A dialogue window pops up with various available gadgets for a blogger site.
2. Select the gadget you wish to add and click the Save button as shown in the screenshot below.

3. Click the Save Arrangement button located at the top right hand side of the Layout page.
To Remove/Delete A Blog Gadget/Widget:
1. Click the Edit link in the gadget you want to remove. Then click on the Remove button from the pop up window. Click Yes to confirm that you want to delete the gadget.
2. Click the Save Arrangement button located at the top right hand side of the Layout page.
To Move A Gadget To Another Section:
1. simply click, drag and drop on the desired section.
2. Click the Save Arrangement button located at the top right hand side of the Layout page.
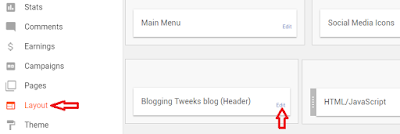
Adding Your Blog/Site Banner
Your blog banner contains your blog logo, blog name and optionally some blog description. A blog banner is not very necessary. It only makes your blog look very professional. If you do not add a site banner, your blog title takes its place. You can design a blog blog banner with any image editing application or tool like Adobe Photoshop, Corel Draw, Canva - an online free design tool, etc. Your blog banner should be rectangular and should not be more than 400 by 100 pixels in dimension and should have a transparent background so that it can fit into any blog template.
To Add Site Banner:
1. Click the Layout tab. Here you can add, edit and delete different gadgets tin your blog. then click Edit in the Header gadget of your blog as shown in the screenshot below.

2. This prompts a dialogue window where you can select and upload the site banner. Click the Choose File button and select the site banner image. Select Instead of title and description under the Placement section and click the Save button as shown in the screenshot below.

Adding A Custom Blog Favicon
Favicon is a minimized version of your site logo which appears on every web browser tab. Your custom favicon will replace the default Blogger favicon. It makes your site look professional. Note that it is not an SEO tip. The recommended dimension of favicon is 50 by 50 pixel image (square).
To add A Custom Blog Favicon:
1. Ensure you are in the Layout page. Click the Edit link in the favicon gadget as shown in the screenshot below.

2. A dialogue window pops up. Select the custom favicon image from your computer and click Save.
Conclusion:
I have explained a step by step guide on how to create and set a professional blog on blogger.com platform. There are other customization, but the ones I explained here are the important setups and configurations you need to do even before writing a blog post. After you have setup your blog as i explained in this tutorial Article, the next thing is to write engaging post articles that are free from Plagiarism.
You also need to work more on your blog's SEO. Check out How To Boost Your Site SEO With Google Tag Manager.
See: 15 Simple Ways To Increase Your Website Traffic For Free
I know you have some suggestions and questions on how to create and setup a professional blog on blogspot platform. I will glad to hear it in the comment section below.
Also click Here to subscribe for free so that you will get our latest post and video updates in your email.
Please help us to reach your social media friends by clicking any of the share buttons below. Good luck!


 Apk + Obb Data File")
, Median & Mode in Excel")


Wow, another great article, I have been using Blogger for quite some time now and still learned something, thank you.
ReplyDeleteSylvain Richard
owner of
sylvainrichard.blogspot.com
Thanks Richard for the compliment. I will always post helpful articles. It is my hobby
Delete