
This is the second part of this PowerPoint tutorial.It is a step by step tutorial that explicitly explains how to manipulate the SmartArt elements and Master Slide features of PowerPoint.
If you have not read the first part, click: INTRODUCTION TO MS-POWERPOINT – PART 1 (VERSIONS 2007, 2010, 2013 and 2016)


2. Click the Insert tab and click the SmartArt button located in the Illustrations group. This prompts the Choose a SmartArt Graphic dialogue box to appear.
3. Select a chart or diagram type from the list, and then select a chart or diagram sub-type. Click OK. PowerPoint inserts the SmartArt object into the slide as shown in the figure below.


2. Select the shape before or after which you want the new shape to be.
3. Click the Design tab under SmartArt Tools, located at the topmost middle of the application window and then click the dropdown arrow under Add Shape in the Create Graphic group as shown below and then select Add Shape before or Add Shape after depending on your need.


• Check the Slide Number box.


If you have not read the first part, click: INTRODUCTION TO MS-POWERPOINT – PART 1 (VERSIONS 2007, 2010, 2013 and 2016)

Working with SmartArt Elements in PowerPoint 2016
The SmartArt tool helps you to create high quality diagrams
and symbols. You can use this tool to convert bulleted lists into a diagram and
symbols. This feature was first introduced in PowerPoint 2007. This tool has
many categories of diagrams and symbols like: All, list, Process, Cycle,
Hierarchy, Relationship, Matrix, Pyramid, Picture. The figure below shows the
different categories of graphics with their descriptions.
How to Insert SmartArt Graphics/Object in your Slides
To insert SmartArt graphics into your presentation slides:
1. Select the slide you wish to add SmartArt graphics.2. Click the Insert tab and click the SmartArt button located in the Illustrations group. This prompts the Choose a SmartArt Graphic dialogue box to appear.
3. Select a chart or diagram type from the list, and then select a chart or diagram sub-type. Click OK. PowerPoint inserts the SmartArt object into the slide as shown in the figure below.
See: Tips to Help You Prepare & Deliver An Engaging & Interactive Presentation
Recommended MS PowerPoint Textbook
Get this book (Kindle format): Designing Professional Presentation Slides Using Microsoft PowerPoint 2013 and 2016 For Colleges and Beyond.
I recommend it for you.
Click Here to know more about the book.
How to Add Text to a SmartArt graphic Place Holders
Now that you have succeeded in inserting the SmartArt objects into a slide, the next step is to add texts into the text place holders. You can use the text pane or type directly into the placeholder when adding texts to a SmartArt graphic.
To add text to a SmartArt graphic place holder:
1. Click any or each of the [Text] placeholders where you want to add your text and then start to type as shown below.
Manipulating the SmartArt Elements
It is very crucial that you understand how to manipulate and work with SmartArt elements because it will help you to create an effective and attractive SmartArt graphic. Am going to show you some necessary techniques like adding new shapes, replacing shapes with different ones and removing those you don’t need. I will also show you the most interesting which converting slide texts to SmartArt Objects.How to Add a shape to an Existing SmartArt Object/Graphic
Most times when working with SmartArt, you may need to add an extra shape to the smart objecting you are working on.To add a shape to an existing SmartArt Object/Graphic:
1. Select the SmartArt graphic you wish to add the shape.2. Select the shape before or after which you want the new shape to be.
3. Click the Design tab under SmartArt Tools, located at the topmost middle of the application window and then click the dropdown arrow under Add Shape in the Create Graphic group as shown below and then select Add Shape before or Add Shape after depending on your need.
PowerPoint inserts the new shape your specified location.
How to Replace a Shape with Another SmartArt Shape
As it is possible to add shapes, we can also replace existing SmartArt Shapes with new ones. It is very easy to achieve.
To replace a shape with another SmartArt shape:
1. Select the SmartArt graphic containing the shape you wish to replace and then select the shape that you want to replace.
2. Click the Format tab located under SmartArt Tools and then click the Change Shape button in the Shapes group. The Shapes Gallery appears as shown below.
3. Select any shape of your choice from the shape gallery. PowerPoint replaced the existing shape with the new one.
How to Convert Slide Texts into SmartArt Objects
Like I said earlier, information represented graphically drives more points than those represented using bulleted texts. In PowerPoint 2007 and later versions, you can convert these bulleted texts to SmartArt object easily.
To convert slide texts into SmartArt objects:
1. Select the placeholder that contains the text you want to convert as shown below.
2. Click the Convert to SmartArt button in the Paragraph group under the Home tab. The SmartArt gallery appears with some layouts that work best suits bullet lists.
3. Select a layout from the gallery or click on More SmartArt graphics to see all layouts and then select any of your choice. PowerPoint transforms the selected text into a SmartArt graphic as shown below.
If you wish to apply the layout I used in this illustration,
it is located under lists as shown below. I added those thumbnail pictures by
clicking the picture frame in the Type
your name here pane shown in the figure above and then I selected Work
Offline from the dialogue box
that popped up. Finally, I now
browsed for the picture in my hard drive. You can browse for pictures online if
your computer us connected to the internet.
 |
Choose the Vertical Picture List Under List Category
|
Further Research on PowerPoint SmartArt
Play around the
Design and Format tab located under
SmartArt Tools tab if you wish to discover and learn more about SmartArt.
It is the beauty of PowerPoint presentation slides. There is more Smart art
tool than what I just showed you. In fact my aim is to entice you so that you
can learn more on your own.
Working with Master Slides
Master Slide View
It is important that you understand the difference between Master
Slide View and Normal Slide View.
The master slide is a PowerPoint template and it used to design
the layout of slides before you start to add content to individual slides.
It can also be used to specify colours, fonts, headings, images
and object positions. Once added to the master slide, these
specifications will automatically be applied to all other slides in the
presentation. This saves a lot of work and time.
How to Open and Close the Master Slide
To Open Master Slide:
1. Click the View tab.
2. Click Slide Master. PowerPoint displays the Master Slide view. The first option in the list preferable most times.
To Close Master Slide:
1. Click Close Master View under Slide Master tab in the Close group as shown below.
PowerPoint displays
the Master Slide view. The first option in the list preferable most times.
How to Add Slide Numbers and Dates on the Header or Footer of your Master Slide
A presentation with
slide numbers and dates is more professional and sometimes exam questions may
require you to add page numbers and dates to the master slide. You can achieve
this in master slide. This procedure also shows you how to add a header and
footer on your master slide.
To add slide numbers and dates to master slide:
1. Open Master Slide View. Click the Insert tab and then click Header and Footer under the Text group.
2. PowerPoint opens the Header & Footer window.
Do the following:
• Check the Date and Time box.
• Select the sub-option Update Automatically under Date and Time.
• Check the Slide Number box.
• Check the Footer box and then type the footer note inside the text box under the footer check box. You may also check the last check box Don’t show on title slide if you don’t want the header and footer to appear on the slide containing the title.
• Click Apply as shown below.
3. Close Master Slide View and you will notice that the Date/Time and Page Number has been added to the bottom of each slide.
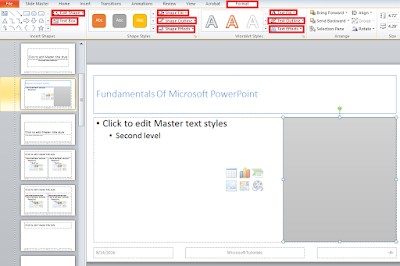
How to Add Coloured Shapes to your Master Slide
Adding any shape of your choice to your master slide is most times used as an alternative for the header and footer. You can easily add any shape of your choice by simply selecting the shape. Remember that any shape you add to the master slide will automatically appear in all your presentation slide, thereby saving you time and energy.
To add coloured shapes to your master slide:
1. Open Master Slide. Click the Insert tab and then click Shapes under the Illustrations group.
2. Select any shape of your choice and then click and drag on the Master Slide draw it.
To change the colour of the shape:
1. Click the shape and click the Format tab.
2. Click Shape Fill and then select any colour of your choice.
To remove the line border from the shape:
1. Click the shape and click the Format tab.
2. Click Shape Outline under the Shape Styles group and then select No Outline.
3. The shape is set above other items on the slide. To send it behind other items, right click the shape and click Send to Back.
4. Close Master Slide View and you will notice that the shape has been applied to all slides as shown below.
NOTE:
There are more
things to learn under the Format tab. Check the features under Shape
Effects, Text Fill, Text Outline, Text Effect and Edit
Shape drop down menus yourself as indicated in the image above. Just play
around the Format tab. It is full of fun!
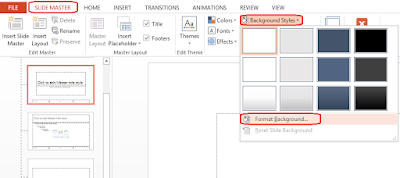
How to Change the Background Colour of the Master Slide
You may wish to change the background (canvas) colour of
your slide. Changing the background colour of your master slide helps you to
achieve
To change the background (canvas) colour of your master slide:
1. Open Master Slide View through the View tab.
2. Click Background Style under the Background group of the Slide Master tab.
3. Click Format Background as shown below.
4. Then the Format Background dialogue box appears at the extreme right of the window. Choose Solid Fill and select any colour of your choice and then Click Close as shown below.
NOTE:
You can
also choose Gradient fill, Picture or texture fill or Pattern fill
depending on your choice.
How to Add Text to the Master Slide
Most times you may
wish to add text that appears on every slide of the PowerPoint, for example
presentation title. The best way to do this is on the Master Slide. This is how
you do it:
To Add Text to the Master Slide:
1. Open Master Slide View.
2. Click the Insert tab.
3. Click the Insert Place holder drop down arrow located in the Master Layout group and then select Text from the drop down menu as shown below.
 |
Insert text on Master slide
|
4. Click and drag to draw the Text Box in the correct position.
5. Highlight and delete all the default bullet points and text and type in the text that you want to display as shown below.
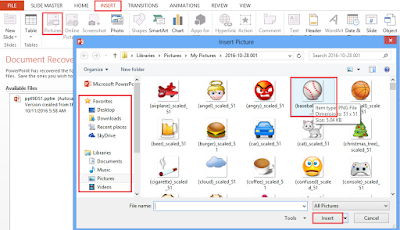
How to Add Images from your Computer to the Master Slide
Most times, you may
want to add a picture or a logo that appears on every slide of the PowerPoint.
The best way to do this is on the Master Slide.
To Add Images from your Computer to the Master Slide:
1. Open Master Slide View.
2. Click the Insert tab.
3. Click the Picture icon located in the Images tab. The Insert Picture dialogue box appears as shown below.

4. Open the location of the image in your hard drive and select the image or logo and then click Insert as shown above.
5. Position the image into the correct place and resize if necessary.
6. Then close the Master slide view. PowerPoint inserts the image in all individual slides.
This is the end of the Part 2 of this PowerPoint tutorial.
Now go to the Part 3:
Hope you learnt a lot from this tutorial? Comment below if you have any confusion. Don’t forget to share this article with your friends. Also subscribe to get our latest posts.


 Apk + Obb Data File")
, Median & Mode in Excel")


No comments:
Post a Comment
WHAT'S ON YOUR MIND?
WE LOVE TO HEAR FROM YOU!