
This is the third and last part (Part 3) of the PowerPoint tutorial. It explicitly explains the various procedures to work with multimedia, other programs like MS-Word and MS-Excel and some finishing touches in PowerPoint presentation.
 3. From the resulting menu, select Audio in my PC or Video in my PC as the case may be. The Insert Sound dialog box appears.
4. Locate and select the audio or video file you want to insert, and click Insert.
5. If desired, click and drag the audio or video icon to a different location on the slide.
6. Click on the video or audio file icon and then click on the Playback tab.
7. Under the Video Options group, on the Start drop down menu, select Onclick or Automatically. Also decide whether to allow the clip Play full screen, Hide while not playing, Loop until stopped or Rewind after playing by checking or unchecking any of the boxes as shown below.


1. Select the slide to contain the audio or video file.
2. Click the Insert tab on the Ribbon and click the video or audio drop down arrow in the Media group located at the extreme right as the case may be.
3. From the resulting menu, select online audio or online video as the case may be. The Insert Video or Audio dialog box appears.
4. Select the first option to search for the video or audio directly on youtube. But if you already the URL link to the file, select the second option as shown below.
 5. Select the desired video from the search result and click Insert as shown below.


2. In Excel, select the content (worksheet, range of cells, or chart) that you want to insert into the presentation.
3. Press Ctrl + C to copy the selected content to clipboard.
4. Activate the PowerPoint presentation file and navigate to the slide where you want to insert the Excel content.
5. Click the Home tab and click the Paste drop down arrow located in the Clipboard group. A list of paste options appears as shown below.

4. Insert the data you want in the worksheet, and select File > Close from the menu when you’re finished. The Excel content is saved in the presentation.


2. Click Package Presentation for CD, and then click the Package for CD button.
3. Name your CD something descriptive and then put a blank writeable CD in the CD-ROM drive. Then click Copy to CD as shown above.

Interacting with Multimedia in PowerPoint
Multimedia is a combination of audio, video, animation, and
graphics. Adding multimedia to your presentations is a great way to keep things
interesting and entertaining.
How to Insert Video or Audio from your PC to your Presentation Slides
Adding Sounds to
your Presentation slide is a way to make your Presentations lively. You may
wish to insert audio or video file available in your computer into your
presentation slides in PowerPoint. You will also learn how to insert and
use action buttons.
To Insert Video or Audio from your PC to your Presentation Slides:
1. Select the slide to contain the audio or video file.
2. Click the Insert tab on the Ribbon and click the video or audio drop down arrow in the Media group located at the extreme right as the case may be as shown below.
4. Locate and select the audio or video file you want to insert, and click Insert.
5. If desired, click and drag the audio or video icon to a different location on the slide.
6. Click on the video or audio file icon and then click on the Playback tab.
7. Under the Video Options group, on the Start drop down menu, select Onclick or Automatically. Also decide whether to allow the clip Play full screen, Hide while not playing, Loop until stopped or Rewind after playing by checking or unchecking any of the boxes as shown below.
Recommended MS PowerPoint Textbook
Get this book (Kindle format): Designing Professional Presentation Slides Using Microsoft PowerPoint 2013 and 2016 For Colleges and Beyond.
I recommend it for you.
Click Here to know more about the book.
How to Insert a Video Link from YouTube to your Presentation Slide in PowerPoint
Most times, you
might want to insert a video link in your presentation slide so that when the
audience connected to internet clicks the link, it take him to the online
video. This feature was introduced in PowerPoint 2013 and later versions. Note
that you might need an internet connection to achieve this.
To Insert a Video or Audio link from YouTube to your Presentation Slide in PowerPoint:
2. Click the Insert tab on the Ribbon and click the video or audio drop down arrow in the Media group located at the extreme right as the case may be.
3. From the resulting menu, select online audio or online video as the case may be. The Insert Video or Audio dialog box appears.
4. Select the first option to search for the video or audio directly on youtube. But if you already the URL link to the file, select the second option as shown below.

6. Click on the Slide Show tab and select from current slide option located in the Start Slide Show group. Click the play button to preview the video or audio.
How to Add Action Buttons to your Presentation Slide in PowerPoint
Action buttons are
most commonly used for self-running presentations—for example, presentations
that are presented at a booth or kiosk. Insert it to the master slide if you
want it to appear in all the slides of the presentation.
An action button is
an object on a slide that performs an action when clicked or pointed to, such
as jumping to another slide or playing a sound.
To Add Action Buttons to your Presentation Slide in PowerPoint:
1. Click the Insert tab and click the Shapes button in the Illustrations group. The Shapes gallery appears. Notice the Action Buttons section at the bottom of the gallery.
2. Select the action button you want to use for example, the home button takes you to the first slide. The mouse pointer changes to a cross-hair, indicating that you can insert the action button.
3. Click on the slide where you want to insert the action button.
The action button is inserted and the Action Settings dialog box appears. Here you can customize the button and specify what type of action you want to action button to incur, and whether or not you want it to begin when the button is clicked or on mouse over.
4. Specify your options in the Action Settings dialog box and click OK when you’re finished as shown below.
 |
Action-setting dialogue box
|
How to Apply Transition and Animation Effects
PowerPoint offers a variety of tools you can use to make
your presentations more effective. For example, you can add exciting transition
effects to your slides, changing how PowerPoint advances from one slide to the
next. You can also animate the text and objects on your slides, making each paragraph
on a slide appear one at a time in succession.
NOTE:
Apply the
Dissolve transition effect to the first slide in the presentation.
How to Apply a Transition Effect
Transition effects make PowerPoint more lively and
interesting. A transition is an animation that occurs when PowerPoint advances
from one slide to the next during a slideshow. PowerPoint offers more than 40
different transition effects for you to choose from.
You can choose to modify a transition effect to only one slide or to all the presentation slides.
How to Apply a Transition Effect to only One Slide
To apply a transition effect to a single slide, follow these steps:
1. Select the slide you want to add a transition effect to.
2. Click the Transitions tab and click the More button in the Transition to This Slide group. The Transitions gallery appears.
3. Select a transition effect from the gallery as shown below.
A tiny star appears in the bottom-left corner of the slide,
indicating that the transition effect has been applied.
How to Apply a Transition Effect to all Slides
You may wish to apply the same transition effect to all
slides in a presentation,
To apply a Transition Effect to all Slides:
1. Select all the slides by holding down the Ctrl key and clicking on each slide.
2. Select a transition effect from the gallery.
A tiny star appears in the bottom-left corner of the slide, indicating that the transition effect has been applied. The transition effect is applied to all of the slides in the presentation.
How to Adjust a Transition Effect
You can customize transition effects to meet your needs, including adjusting its duration and adding sound.
How to Adjust a Transition Duration and Delay of a Transition Effect
Transitions can occur at a slow, medium or fast speed according to your personal and professional preference.
To Adjust a Transition Duration or Delay of a Transition Effect:
1. Click the slide containing the transition effect you want to modify to highlight it.
2. Click the Transitions tab and use the Duration or Delay drop down arrow in the Timing group to set the duration or delay period as the case may be.
How to Add Sound to a Transition Effect
Adding sound to a transition effect is a fun way to grab audience attention.
To Add Sound to a Transition Effect:
1. Click the slide containing the transition effect you want to modify to highlight it.
2. Click the Transitions tab and click the Transition Sound list arrow in the Timing group. A list of sounds appears as shown below.
3. Select a sound from the list.
How to Apply a Standard Animation Effect to your Slides
An animation effect is a preset visual effect that can be applied to the text or objects on a slide. The fastest way to apply an animation effect is to use one of PowerPoint’s standard, foolproof animations.
To Apply a Standard Animation Effect to your Slides
1. Select the text or object that you want to animate.
2. Click the Animations tab and click the Animate Style list arrow in the Animation group.
A list of preset animation effects appears shown below.
3. Select an animation effect from the list.
The preset animation is applied to the text or object and a preview of the effect is displayed.
How to Apply a Custom Animation Effect to your Slides
Custom animations give you more control over how the effect appears on the slide. For example, you could apply a motion path that moves an object in a specified pattern across the slide.
To Apply a Custom Animation Effect to your Slides:
1. Select the text or object that you want to animate.
2. Click the Animations tab click the Add Animation list arrow located in the Animation group.
3. The Custom Animation task pane appears with the following categories:
• Entrance: To have the text or object enter with an effect, select this option.
• Emphasis: To add an effect that emphasizes the text or object on the slide, select this option.
• Exit: To have the text or object leave the slide with an effect, select this option.
• Motion Paths: To add an effect that makes the text or object move in a specified pattern, select this option.
4. Select an animation effect from any category of your choice.
PowerPoint applies the selected effect to the object and a preview of the effect is displayed.
How to Modify Animation Effects
You can modify animation effects to further meet your needs. This lesson will show you how to adjust the speed and starting point of an animation effect and how to remove an animation effect if you decide you don’t like it.
How to Adjust the Duration or Delay of an Animation Effect
Depending on the type of presentation you’re creating, you might want certain animation effects to play longer than others. Each effect is assigned a speed by default (Slow, Fast, Very Fast, etc.), but it’s easy to change this to meet your needs.
To Adjust the Duration or Delay of an Animation Effect
1. Click the slide containing the transition effect you want to modify to highlight it.
2. Click the Animations tab and use the Duration or Delay drop down arrow in the Timing group to set the duration or delay period as the case may be.
How to Adjust when an animation starts
By default, custom animations start “on click,” which means you have to click the mouse each time you want to run an animation effect during a slideshow. However, you can adjust this to meet your needs.
To Adjust when an animation starts
1. Click the Animations tab.
2. Click the Start drop down arrow located in the Timing group.
A list of options appears as shown below:
• Start on Click: Starts the animation effect when you click the slide.
• Start with Previous: Starts the animation effect at the same time as the previous effect in the list (i.e., one click executes two animation effects).
• Start after Previous: Starts the effect immediately after the previous effect. Or, if this is the first or only animation effect on the slide, selecting this option will start the effect as soon as the slide appears onscreen.
3. Select an option from the list and adjust the duration and delay period.
Interacting with Other Programs in PowerPoint
One of the great benefits of Windows-based programs is that they can share information with each other. In this section, you’ll learn how to insert a Microsoft Excel worksheet into a slide, how to modify linked or embedded content, and how to work with Microsoft Word to create handouts and outlines.
Interacting with MS-Excel in PowerPoint
You can include content from an Excel workbook by inserting it into a PowerPoint presentation.
How to insert existing Excel data as an Object in PowerPoint
You can embed or link data from an existing Excel workbook.
To insert existing Excel data as an Object in PowerPoint:
1. Ensure that both the PowerPoint presentation that you want to insert the Excel content into, and the Excel worksheet that contains the content you want to insert are open.
Have both files open so you can copy and paste from one to the other.
2. In Excel, select the content (worksheet, range of cells, or chart) that you want to insert into the presentation.
3. Press Ctrl + C to copy the selected content to clipboard.
4. Activate the PowerPoint presentation file and navigate to the slide where you want to insert the Excel content.
5. Click the Home tab and click the Paste drop down arrow located in the Clipboard group. A list of paste options appears as shown below.
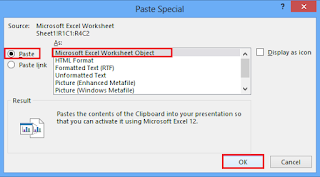
6. Select Paste Special. The Paste Special dialog box appears.
7. Select Microsoft Office Excel Worksheet Object from the list.
8. To embed the content, select the Paste option. To link the content, select the Paste link option and Click OK as shown below.
PowerPoint inserts the Excel content as an object into the presentation slide.
How to Insert a New Excel Worksheet
You can also embed a new Excel worksheet into a presentation if you do not have a worksheet already created with the data you need.
To Insert a New Excel Worksheet:
1. Navigate to the slide where you want to insert the worksheet.
2. Click the Insert tab and click the Table list arrow in the Tables group. A list of options appears.
3. Select Excel Spreadsheet from the list. The spreadsheet appears in the presentation.
4. Insert the data you want in the worksheet, and select File > Close from the menu when you’re finished. The Excel content is saved in the presentation.
Interacting with MS-Word in PowerPoint
There may be need for you to collaborate with Microsoft Word while working with PowerPoint.
How to Insert MS-Word file as an Object in PowerPoint
You can include content from a Word document by inserting it into a PowerPoint presentation.
To Insert MS-Word file as an Object in PowerPoint:
1. Ensure that both the PowerPoint presentation that you want to insert the Word content into, and the Word document that contains the content you want to insert are open.
Have both files open so you can copy and paste from one to the other.
2. In Word, select the content that you want to insert into the presentation.
3. Press Ctrl + C to copy the selected content to clipboard.
4. Activate the PowerPoint presentation file and navigate to the slide where you want to insert the Excel content.
5. Click the Home tab and click the Paste drop down arrow located in the Clipboard group. A list of paste options appears.
6. Select Paste Special. The Paste Special dialog box appears.
7. Select Microsoft Office Word Document Object from the list.
8. To embed the content, select the Paste option. To link the content, select the Paste link option.
9. Click OK as shown below.
 |
Paste Special dialog box appears
|
PowerPoint inserts the Word content as an object into the presentation slide.
How to Create and Print Presentation Slide Handouts in Microsoft Word from PowerPoint
One way to deliver or supplement a PowerPoint presentation is to print off handouts of your slides and distribute them to your audience.
To Create and Print Presentation Slide Handouts in Microsoft Word:
1. Click the File tab and select Export > Create Handouts > Create Handouts. The Send to Microsoft Office Word dialogue box appears.
2. Select the page layout that you want to use.
Now you need to select how you want to insert the slides into the document. You have two options here:
• Paste: Select this option to create static handouts (i.e. the handouts will remain unchanged even if you make updates to the presentation).
• Paste link: Select this option to create dynamic handouts (i.e. any updates made to the presentation will be reflected in your handouts).
3. Select a paste option and click OK as shown below.
Finishing touches - Setting Up a Slide Show
There are some important finishing touches you have to make on your presentation slides before you deliver your presentation in front of an audience. You have to determine the show type and also decide the slides you should include and the ones you should not include.
How to Determine the Show type to Specify
The show type you will specify on whether you are delivering your presentation in front of a live audience or unattended audience at a pod.
To Determine the Show type to Specify:
1. Click the Slide Show tab and click the Set Up Slide Show button in the Set Up group.
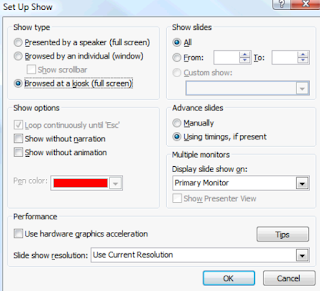
The Set Up Show dialog box appears. Under Show type, you have several options to choose from:
• Presented by a speaker: This is the typical full-screen slideshow. You can advance the slides and animations manually, or you can set automatic timings.
• Browsed by an individual: Runs the slideshow in a standard window, with custom menus and commands for the viewer to use.
• Browsed at a kiosk: Delivers the slideshow as a self-running show that loops continuously (restarts at the end of the presentation). The viewer can click hyperlinks and action buttons but cannot modify the presentation.
2. Select the desired option, and click OK to save your changes as shown below.
How to Determine the Show Options of your Presentation Slides
Depending on your choice and need, you might want your presentation slideshow to start over automatically each time it finishes, or run without any of the recorded narration.
To Determine the Show Options of your Presentation Slides
1. Click the Slide Show tab and click the Set Up Slide Show button in the Set Up group. The Set Up Show dialogue box appears. Under Show options, you have several options to choose from:
• Loop continuously until ‘Esc’: Select this option if you are leaving the show unattended and want it to continuously repeat.
• Show without narration: If you recorded narration but don’t want to use it, select this option.
• Show without animation: Select this option to disable animations. This might be necessary for presentations being viewed on slower computers.
2. Select the desired option, and click OK to save your changes as shown below.
How to Determine and Specify which slides to include
For some reasons, you may not want to include all slides in a slideshow and decide to select some.
To Determine and Specify which slides to include:
1. Click the Slide Show tab and click the Set Up Slide Show button in the Set Up group. The Set Up Show dialogue box appears. Under Show slides, you have several options to choose from:
• All: Select this option to include all slides in the presentation (except for slides you’ve hidden).
• From: Select this option to include a range of slides that you specify.
• Custom show: Select this option to pick and choose any number or range of slides that you wish.
2. Select the desired option, and click OK to save your changes as shown below.
How to Specify How Slides advance During Presentation
You want to advance through the presentation slides manually, or allow PowerPoint do it for you automatically depending on your slide’s timing.
To Specify How Slides advance During Presentation:
1. Click the Slide Show tab and click the Set Up Slide Show button in the Set Up group. The Set Up Show dialogue box appears. Under Advance slides, you have two options to choose from:
• Manually: Selecting this option requires you to click the mouse or use the direction keys on your keyboard to advance slides.
• Using timings, if present: Select this option to move slides forward automatically based on the timings you save when you rehearse.
2. Select the desired option, and click OK to save your changes as shown below.
Rehearsal Time - Slide Show timings
When you deliver your presentation in front of audience, you have to brief them on each slide and you want to make sure that each slide is displayed for an adequate amount of time. PowerPoint’s Rehearse Timings feature lets you rehearse your presentation beforehand, and then specify that your slides advance automatically according to these timings.
To Utilize the Rehearsal Show timings:
1. Click the Slide Show tab and click the Rehearse Timings button in the Set Up group.
The presentation opens in Slide Show view and the Rehearsal toolbar appears as shown below.
2. Navigate through the presentation, leaving each slide displayed for the approximate length of time that you want it to be displayed during your presentation.
NOTES:
• Always remember that PowerPoint is recording your every move, so maintain a pace while going through your slides if you really want your audience to enjoy your presentation.
• If you mess up or want to restart the timing on a slide, click the Repeat button on the Rehearsal Toolbar.
When you’re finished, a dialog box appears asking whether or not you want to save your timings.
3. Click Yes to save your timings, No to discard them.
If you chose to save your timings, your slides will automatically advance using those timings the next time you run the slide show.
NOTES:
• If you decide you want to run your presentation manually without timings, click the Slide Show tab on the Ribbon and click the Set Up Slide Show button in the Set Up group. Select Manually under Advance slides, and click OK.
• To redo your timings, simply run the Rehearse Timings feature again.
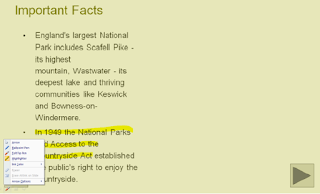
How to Use the Pen to make Annotations
When a presentation is displayed in Slide Show view you can use the Pen tool to write on your slides or highlight important information.
To Use the Pen to make Annotations:
1. Open the presentation in Slide Show view.
2. Click the Pen button in the bottom-left corner of the slide.
Other Ways to Activate the Pen Tool: Press Ctrl + P.
3. Click and drag on the slide as shown below.
To erase an annotation: press E.
4. Press Esc when you’re finished to exit pen mode.
How to Change Pen Style and Colour
PowerPoint provides you with three pen styles: Ballpoint, Felt Tip, and Highlighter, and an entire palette of colors to choose from when it comes to the Pen tool.
To Change Pen Style and Colour
1. Display the presentation in Slide Show view and click the Pen button in the bottom-left corner of the slide. The Pen Tools menu appears.
2. Select Ballpoint Pen, Felt Tip Pen, or Highlighter from the menu. The arrow pointer changes shape, depending on the pen style you selected.
3. Click the Pen button once again and point to Ink Colour. The colour palette appears.
4. Select a colour from the colour palette.
The PowerPoint Annotation Shortcut Keys`
• To change arrow to pen: Press Ctrl + P
• To change pen to arrow: Press Ctrl + A or Esc
• To erase on-screen annotations: Press E
How to Create a Self-running Presentation
When you design a self-running presentation, you’ll want to keep the setting and purpose of the presentation in mind. Depending on the level of interaction you wish to create for your audience, PowerPoint gives you several options you may wish to consider when creating a self-running slide show. They include:
• Automatic or manual timings: You can set a slide show to run by itself with automatic timings, or you can set it so that users can move through the show at their own pace using the mouse. Mouse clicks are ignored unless they’re on objects that have hyperlinks.
• Hyperlinks: You can set up hyperlinks to move through the slide show, or to jump to other slides and programs. See the chapter on Working with Other Programs for more information.
• Voice narration: You can add recorded narration that plays with your slide show.
To create a self-running Presentation:
1. Open the presentation that you want to automate.
2. Click the Animations tab and click the Automatically After check box in the Transition to This Slide group. You now need to specify how long you want each slide to be displayed.
3. Click the up and down arrows until the desired amount of time appears. Or type it manually. PowerPoint automatically advances to the next slide after the specified amount of time has passed.
4. Click the Apply to All button in the Transition to This Slide group.
5. Click the Slide Show tab and click the Set Up Slide Show button in the Set Up group as shown in the figure below.
How to Save your PowerPoint Presentation File to a Flash Drive
When you are through with the presentation file design, you will need to save file to a Flash drive so you can show it at your presentation.
To save your PowerPoint presentation file to a flash drive:
1. Click on the File tab and then click Save As.
2. Type in a descriptive file name for your PowerPoint presentation file and then select the save location, which is your flash drive and finally click Save.
How to Create a Video
from your Presentation Slides in PowerPoint
You can create a video from your Microsoft Presentation file you have already prepared or immediately after preparing the file. PowerPoint incorporates all recorded timings, narrations and laser pointer gestures and also preserves animations, transitions and media.
To Create a Video from your Presentation file in PowerPoint:
1. Open the presentation file from which you want to create the video.
2. Click the File tab and Click Export. From the resulting menu, click Create a Video.
3. Select the video and display type you want by clicking the first drop down arrow.
4. Click the second drop down arrow as shown above. If you have already set the timing and narration for the presentation and wish to use it, select Use Recorded Timing and Narration. If you don’t want PowerPoint to incorporate the timing and narration in the video, select Don’t Use Recorded Timing and Narration.
 Select the video and display type you want by clicking the first drop down arrow as shown above.
4. Click the second drop down arrow as shown above. If you have already set the timing and narration for the presentation and wish to use it, select Use Recorded Timing and Narration. If you don’t want PowerPoint to incorporate the timing and narration in the video, select Don’t Use Recorded Timing and Narration as shown below.
 You can select Record
Timings and Narrations to set your presentation timing and narration or
select Preview Timings and Narrations to preview and edit an already set timing and narration as shown above.
You can select Record
Timings and Narrations to set your presentation timing and narration or
select Preview Timings and Narrations to preview and edit an already set timing and narration as shown above.
5. Use the control arrows to set the number of seconds spent on each slide.
6. Click on Create Video.
7. The Save As dialogue box appears. Type a descriptive name for your video and select a save location on your hard drive and click on Save. PowerPoint creates the video from your presentation
slides.
You can create a video from your Microsoft Presentation file you have already prepared or immediately after preparing the file. PowerPoint incorporates all recorded timings, narrations and laser pointer gestures and also preserves animations, transitions and media.
To Create a Video from your Presentation file in PowerPoint:
1. Open the presentation file from which you want to create the video.2. Click the File tab and Click Export. From the resulting menu, click Create a Video.
3. Select the video and display type you want by clicking the first drop down arrow.
4. Click the second drop down arrow as shown above. If you have already set the timing and narration for the presentation and wish to use it, select Use Recorded Timing and Narration. If you don’t want PowerPoint to incorporate the timing and narration in the video, select Don’t Use Recorded Timing and Narration.
Select the video and display type you want by clicking the first drop down arrow as shown above.
4. Click the second drop down arrow as shown above. If you have already set the timing and narration for the presentation and wish to use it, select Use Recorded Timing and Narration. If you don’t want PowerPoint to incorporate the timing and narration in the video, select Don’t Use Recorded Timing and Narration as shown below.
4. Click the second drop down arrow as shown above. If you have already set the timing and narration for the presentation and wish to use it, select Use Recorded Timing and Narration. If you don’t want PowerPoint to incorporate the timing and narration in the video, select Don’t Use Recorded Timing and Narration as shown below.
You can select Record
Timings and Narrations to set your presentation timing and narration or
select Preview Timings and Narrations to preview and edit an already set timing and narration as shown above.
5. Use the control arrows to set the number of seconds spent on each slide.
6. Click on Create Video.
7. The Save As dialogue box appears. Type a descriptive name for your video and select a save location on your hard drive and click on Save. PowerPoint creates the video from your presentation
slides.
How to Burn your PowerPoint Presentation File to CD Drive
Presentations prepared for official use often require that you burn the presentation file to a CD drive. Saving your project to a CD involves a different process than saving to a Flash Drive or folder to ensure your files will be available.
To burn a presentation file to a CD:
1. Click the File tab. For those using version 2010 and earlier versions, click Save & Send. For those using version 2013 and later versions, click File tab > Export. The rest are the same.
 |
| Package Pesentation for CD window |
3. Name your CD something descriptive and then put a blank writeable CD in the CD-ROM drive. Then click Copy to CD as shown above.
 |
Package for CD dialogue box
|
4. PowerPoint will then burn your CD with all the files needed by the presentation file including the embedded multimedia files. Then label your disc.
Hope you learnt a lot from this tutorial? Comment below if you have any confusion. Don’t forget to share this article with your friends. Also subscribe to get our latest posts.


 Apk + Obb Data File")
, Median & Mode in Excel")


No comments:
Post a Comment
WHAT'S ON YOUR MIND?
WE LOVE TO HEAR FROM YOU!