
Before an error message whether customized or default can be
displayed, you must restrict what goes into a cell in your worksheet, so that
when it is violated, the error message will be displayed. You should also set a
custom input message for the cell or column to tell he user the type of data or
number of characters to enter in that cell. In this tutorial, I will explicitly
explain step by step with screenshots, how you can set a custom error message, input
message and error alert for a cell, group of cells or column in MS Excel.

For example, as an MS Excel spreadsheet manager, you might
want to design a product stock system for one of your clients. The system will
have a PRODUCT DESCRIPTION column in which the number of characters for the
description of each product must not be more than 50 characters. You will need
to add a custom error message for that column through the Data Validation feature in Microsoft Excel. You can also set up
input message to tell the user the type of data he or she is required to enter
in that cell or column.
This is part 4 of chapter 7 of the Free Online Excel Tutorial Series at Microsoft Tutorial website. In the previous part (part 3), I explicitly explained how to create a dropdown menu list in MS Excel. Also see the full tutorial course content of this Microsoft Excel Tutorial Series.


This is part 4 of chapter 7 of the Free Online Excel Tutorial Series at Microsoft Tutorial website. In the previous part (part 3), I explicitly explained how to create a dropdown menu list in MS Excel. Also see the full tutorial course content of this Microsoft Excel Tutorial Series.
To Set a Custom Error Message for a Column in your Excel Worksheet:
1. Prepare your worksheet like the one shown below.
2. Highlight the entire column C by placing your cursor on the
“C” label and clicking when you see the down pointing arrow.
3. Click the Data
Validation drop down arrow located in the Data tools group under the Data
tab. Then click Data Validation from
the resulting dropdown menu option. This prompts the Data Validation dialogue box.
4. Under the Settings tab,
click the Allow: drop down arrow and
select Text Length from the
resulting options. This activates the Source
text box.
5. Select between
from the Data drop down menu list.
6. Since the character should not be more than 50, type 0 in the Minimum text box and type 50
in the Maximum text box as shown
below.

You have restricted the number of characters that each cell
under the PRODUCT DESCRIPTION column will accept. But if the specified number of
characters are exceeded, MS Excel will pop up a default error message dialogue
box that warns the user about wrong entry without telling the user how to
correct the mistake.
So you need to set an input message that displays beside
the selected cell and tells the user the type and number of characters accepted
in that cell. But it is optional.
Then you need to customize the error message to advise the
user on what to do.
To Set a Custom Input Message for a Cell or Column in Excel:
1. Highlight the desired cell or entire column and call up the Data Validation dialogue box using the
above specified procedure.
2. Click the Input
Message tab and ensure that the “Show
input message when cell is selected” check box is checked.
3. In the Title text
box, type some text for the title of your input. For example, you can type: Number of Characters Should Not Exceed 50!
4. Click inside the Error
Message field (also optional) and type some text for the main body of your
input message as shown below. This explains more about what you wrote in the
title text box.

5. Click OK to close the Data
Validation dialogue box.
So once the user selects any cell under the DESCRIPTION
column in the above worksheet, MS Excel displays your customized input message
beside that cell as shown below.

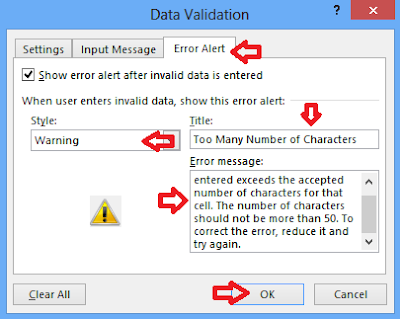
To Set a Custom Error Alert for a Cell or Column in Excel:
1. Highlight the desired cell or entire column and call up the Data Validation dialogue box using the
above specified procedure.
2. Click the Error Alert
tab and ensure that the “Show error
alert after invalid data is entered” check box is checked.
3. You have three options to choose from the Style drop down menu: Stop, warning and information,
you can select any of them. But I prefer using the Warning style.
4. In the Title text
box, type some text for the title of your error message depending on the option
you selected under the Style drop
sown menu. For example, you can type: Too
Many Number of Characters!
5. Click inside the Error
Message field and type some text for the main body of your error message as
shown below. This explains what the user did wrong and the user can correct can
correct the error.

6. Click
OK to close the Data Validation dialogue
box.
Now, you can test your custom error message by typing a
description more than 50 characters in any of the cells of the PRODUCT DESCRIPTION
column. Press Enter on your keyboard. Your customized error message should pop
up as shown below.

This is the end of part 4 of chapter 7 and the end of this online Microsoft Excel tutorial series.
Was this tutorial helpful to you?
Inform your friends about this post by clicking the share button below. Comment below if you are hooked up along the installation process.
The ebook for designing professional spreadsheet management systems will soon be ready for download. Click Here to subscribe for free so that you will get an update in your email when it is ready.
The ebook for designing professional spreadsheet management systems will soon be ready for download. Click Here to subscribe for free so that you will get an update in your email when it is ready.


 Apk + Obb Data File")
, Median & Mode in Excel")


No comments:
Post a Comment
WHAT'S ON YOUR MIND?
WE LOVE TO HEAR FROM YOU!