
This chapter is sub divided into two parts and this is the
first part. If you have already read this part, click to read part two – Table Operations and Relationships/Join.

In this part of the chapter, I will
explain explicitly, table – one of the objects of a database, its field
properties and data types. At the end of this chapter, I will give some
practical exercises. Please endeavor to practise those exercises as it will help
you to have a deep comprehension of table, its field properties and data types.
In the previous chapter of this tutorial, I taught on introduction to
MS-Access, a Database Administration System, some new features of MS-Access
2016, how to download MS-Access 2016 and other versions, how to load MS-Access
into memory and how to create a blank desktop database, etc.Click to read Part1: Introduction to MS-Access.
You can download the PDF e-book file of this chapter for free and study at your convenient time. The e-book contain both parts of this chapter properly written. Click to download the e-book: Objects of a Database - Table Operations and Relationships.
You can download the PDF e-book file of this chapter for free and study at your convenient time. The e-book contain both parts of this chapter properly written. Click to download the e-book: Objects of a Database - Table Operations and Relationships.
CHAPTER CONTENTS
• OBJECTS OF A DATABASE
• TABLE
• FOUR PRINCIPLES FOR BUILDING A STRONG FOUNDATION FOR YOUR DATABASE
• IMPORTING DATA FROM AND LINKING TO DATA IN ANOTHER DATABASE OR OTHER SOURCES
• METHOD OF CREATING AND VIEWING A TABLE
Datasheet View
Table Design view
• INPUT DESIGN
Combo Box
List Box
Logical Yes or No
• FIELD PROPERTIES
Default Value
Validation Rule
Validation Text
Input Mask
Required
• DATA TYPE
OBJECTS OF A DATABASE
These are the tools used in preparing data which determines the pattern or format of database you are creating. They form the basis for the major operations on a database. They include:
• Tables store the data in the database and are analogous to the foundation of the database. It is critically important that the tables be designed properly; they provide the foundation for building the remainder of the database.
• Queries enable you to extract data from your database tables and allow us to answer questions we have about the data. Queries may combine data from multiple tables and manipulate data output through the use of expressions, formulas, and functions.
• Forms are based on tables or queries, and they are used for entering data into the database in a user-friendly manner. They are also used for displaying data to the end user and can be used to create a menu system for the database.
• Reports use data from a table or query and format the output in a professional-looking manner. Reports provide you with the ability to summarize, sort, group, and display the data in many different ways suited to the needs of the end user. Often, the purpose of a report is to provide a printed output of some data in your database.
• Macros are small programs that you build into Microsoft Access; they perform some advanced operations, making the database more user-friendly and/or functional.
For this chapter, I will explain explicitly, table which is the first and most important object of a database, some of its operations and table relationship.

• Datasheet View
• Table Design View
This method is not a good method of creating a table because it does not allow users to design tables to their taste by defining his data type, primary key and field properties. Also default field names are provided. To create and view a table in datasheet view:


2. Select the field you wish to assign list box.
3. Click the Lookup tab under field properties.
4. Select List box from Display control property drop down menu.
5. Select Value list from Row source type property drop down menu.
6. Position your cursor on Row Source text box and type the values or options you want to appear in your drop down arrow in the datasheet view of your table, separating each value or option from another with a semi colon. For example, Male;Female for Sex field or Single;Married;Divorced;Widowed for MaritalStatus field.
7. Save your work and switch back to datasheet view to see
When assigned or set in a field, you either type -1 for records that met the criterion or type 0 for records that did not meet the criterion in the datasheet view. The criterion is normally specified in the Caption text box under the General tab of the field properties in design view. The criteria may vary depending on the field you wish to assign the logical yes or no. For Sex field, the criterion will either be SEX (Male?) or SEX (Female?). For Marital Status field the criterion will either be MaritalStatus (Married?) or MaritalStatus (Single?).
2. Click the drop down arrow in the Field type column of the field you wish to apply the Logical Yes or No.
3. Select Yes/No from the drop down menu.
4. Click the General tab under Field Properties.
5. Select a format from the Format drop down menu. For this example, I wish to assign the logical Yes/No to the Sex field of my table. So the format that best suites this field is Yes/No set.
6. Type the criterion under the Caption text box. The criterion will either be SEX (Male?) or SEX (Female?).
7. Specify a default value for the field. For this example, we can use either Yes or No. but I will choose No.The final setting is shown below.
 8. Save your work and switch over to design view. You will notice that the value we entered as our criterion in the Caption text box has replaced the Field title Enter some records and when you come to the Sex field, type -1 for Yes or 0 for No.
• Default Value
• Validation Rule
• Validation Text
• Input Mask
• Required
There are others like Field Size, Format, Caption, IME Mode, Text Align, etc. I will explain the first five I listed one by one with illustrations.
2. Select the field you wish to apply default value. For example, a Date or Time field.
3. Click the General tab on field properties.
4. Click the Default value text box and type the syntax =Date$() for Date fields or type =Time$() for Time fields i.e. an equality sign followed by the word Date or Time depending on the field and then followed by a dollar sign($) and finally a pair of parenthesis.
5. Save your work and switch back to datasheet view. Try adding one record to the table. You will notice that on reaching the field you assigned the default field Access generates the current system date or time.
When an age outside the specified age range is entered in the field, Access will pop up a warning dialogue box telling the user that the age entered is out of a range or any message you specified in the validation text. The same thing applies when applied to a Score field.
2. Select the field you wish to validate. For example, a Time or Age field.
3. Click the General tab under field properties.
4. Click the Validation rule text box and set the criteria or condition. For example, if we wish to validate a Score field and want to limit the range of scores entered by users between 180 to 400 both inclusive, the criteria will be >=180 and <=400. This is interpreted as “Scores from 180 to 400 both inclusive”. For a State field, the criteria might be ‘State 1’ or ‘State 2’ or ‘State 3’. Replace State 1, State 2 and State 3 with the states you want the users to enter. You can add any number of states you want. Note that I used single quote and not double.
5. Save your work and switch back to datasheet view. Try adding a score or state outside the range you specified in design view, Access will pop up a default warning alert or validation text telling you that the values you entered are prohibited by the validation rule as shown below.

• Tables store the data in the database and are analogous to the foundation of the database. It is critically important that the tables be designed properly; they provide the foundation for building the remainder of the database.
• Queries enable you to extract data from your database tables and allow us to answer questions we have about the data. Queries may combine data from multiple tables and manipulate data output through the use of expressions, formulas, and functions.
• Forms are based on tables or queries, and they are used for entering data into the database in a user-friendly manner. They are also used for displaying data to the end user and can be used to create a menu system for the database.
• Reports use data from a table or query and format the output in a professional-looking manner. Reports provide you with the ability to summarize, sort, group, and display the data in many different ways suited to the needs of the end user. Often, the purpose of a report is to provide a printed output of some data in your database.
• Macros are small programs that you build into Microsoft Access; they perform some advanced operations, making the database more user-friendly and/or functional.
For this chapter, I will explain explicitly, table which is the first and most important object of a database, some of its operations and table relationship.
TABLE
This is one of the objects of a database that is used to record data in several rows and columns. Table is the most important object of a database because without a table, it will be very difficult to work with the other objects of a database
Any Access database must contain at least one table because it forms the basis for storage in a database. Also note that you cannot perform calculation on tables.
FOUR PRINCIPLES FOR BUILDING A STRONG FOUNDATION FOR YOUR DATABASE
In other to ensure that the integrity of a database is not violated, there are some principles which should be adhered to in order to build a strong foundation for your database. These principles are directed mainly to table because it is the most fundamental object of a database. Following these four principles will help ensure that your database has a solid foundation and will lessen the possibility of “bad” data making their way into your database.
These principles are as follow;
These principles are as follow;
1. Avoid storing redundant data in the database tables:
This is because data stored more than once in your database makes updating data difficult and often leads to inconsistent (bad) data.
2. Never store calculated or derived data in database tables:
This is because calculated or derived data should not be stored because the values used in the calculation may change, which would also require an update of the calculated data. In addition, calculations based on time would eventually result in inaccurate data being stored in the table.
Consider the option of storing the age or date of birth of an employee in a table. If you choose to store age, within a year, all the data will be incorrect in the table unless it is constantly updated! Instead, you should store date of birth, which does not change. But how then would you display the age of an employee on a report if only the date of birth is stored in the table? There are two options. First, you can always build a query to generate a calculated value instead of having to store it in a table.
The second option is to create a field in the table with the calculated data type. This is particularly useful when the calculated data is used in multiple forms and reports since you only have to create it one time in the table. Also, while this second approach appears to directly contradict the principle of not storing calculated data, it is perfectly valid to use this special data type in Microsoft Access.
3. Make sure that data are stored in their smallest parts in the table:
This is best explained with an example: storing employee name (i.e. both surname and last name) in one column of a table makes sorting or searching on that column very difficult. Instead, split the employee name into first name and last name to make the table data easier to use and more flexible.
4. Reporting needs should determine the data stored in the tables:
The outputs of the database (reports) should determine what data need to be stored in the database tables. Failure to include necessary data in your tables will result in incomplete outputs.
IMPORTING DATA FROM AND LINKING TO DATA IN ANOTHER DATABASE OR OTHER SOURCES
This operation is used to get data from or link to a table in one database to another or from other sources. There are some cases that you may need data in database objects like table from another database or sources in your current database. Using this operation in such cases, MS-Access makes it easier. You can link and import a table from Access, Excel, ODBC database, text files, XML files, HTML documents, etc.
When importing objects of a database like tables from another database, if the specified object does not exist, Access will create it. If the specified object already exists, Access will append a number to the name of the imported object. Changes made to source objects (including data in tables) will not be reflected in the current database.
When linking to data in another database, Access will create a table that will maintain a link to the source data. Changes made to the data in Access will be reflected in the source and vice versa. If the source database requires a password, the unencrypted password will be stored with the linked table.
To import from or link to a data in a table in another Access database:
1. Click on External data tab.
2. Click Access under Import & Link group as shown below.
 |
Importing A table from access
|
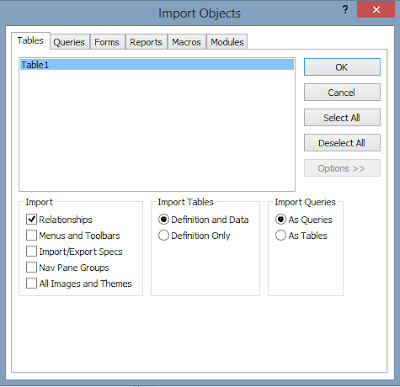
3. The Get External Data dialogue box appears. Click Browse to specify the location of the source database. Locate the source database click it and then click Open.
4. Under Select how and where you want to store the data in the current database, select the first option if you want to import tables, otherwise select the second option to link to a table. Click OK as shown below.
1.
METHOD OF CREATING AND VIEWING A TABLE
There are two three major methods of creating and viewing a table. They include:• Datasheet View
• Table Design View
DATASHEET VIEW
This is one of the methods of creating a table. A datasheet is an electronic sheet just like an ordinary sheet of paper drawn into rows and columns. It lets you view the records in a table or query. It is designed in rows and columns such that it is easily edited and updated.This method is not a good method of creating a table because it does not allow users to design tables to their taste by defining his data type, primary key and field properties. Also default field names are provided. To create and view a table in datasheet view:
1. Access creates a table with a default table name, table1 if that is the first table in that database. The table will have only one column with the column title ID by default as shown in the figure below.
2. Load or launch MS-Access if not already loaded.
3. Create a new blank database or open an existing one.
4. Click the create tab and then click table under the tables group.
5. You can rename the column by double-clicking the column title and then typing the new column name and pressing the enter key. You can also add a new column by first setting the data type (data format to be stored in that column) by clicking the drop down arrow in the column title and selecting the appropriate data type. Access inserts the column with a default column name. You can then rename it.
TABLE DESIGN VIEW
This is one of the methods of creating a table. It is the advance and best method of creating a table because it allows users to create a table to their taste. This is because it allows you to declare your data type and primary key and you can also make use of the field properties. It is mainly used by database administrators. To create a table in design view:
1. Click the create tab and then click table design under the tables group.
2. Access takes you to the table design view. Type your field names and select a data type for each field. The default data type is short text. Click the file tab and click save. Then type in your
desired table name and click OK to save your table as shown in the figure table. A dialogue box pops up asking if you would like to add a primary key. Just click YES or NO.
 |
Table design view
|
NOTES
• A field name should not contain a space or special characters like period (.), asterisk (*), question marks (?), etc. They sometimes cause errors when these field names are used in performing calculations in other objects of a database. Instead use an underscore sign (_).
• You can switch between datasheet view and the table design view by clicking the View dropdown arrow in the Views group of the Create tab.
INPUT DESIGN
These are the extra features an administrator adds to a database in order to make data input interactive. They are a type of field properties. They include:
• Combo box
• List box
• Logical YES or NO
COMBO BOX
This is used to record data which can be selected from the datasheet view without necessarily typing with the keyboard. It displays a drop down menu where data can be selected from. There some fields in a table which you may apply combo box to reduce typing stress when entering data in your table from the datasheet view. Some of these fields include; Marital Status, State, School, etc.
METHOD 1 (From no existing table)
There are two ways or methods of applying combo box:
This method is used when you have few lists to type and does not need periodic update. To apply combo box to a field in your table from no existing table:
1. Create the table and switch to the design view of the table.
2. Select the field you want to assign combo box.
3. Click the Lookup under field properties.
4. Select combo box from Display Control property drop down menu by clicking the drop down arrow at the extreme right.
5. Select Value List from Row source type property drop down menu by clicking the drop down arrow at the extreme right.
6. Position your cursor on Row Source text box and type the values or options you want to appear in your drop down arrow in the datasheet view of your table, separating each value or option from another with a semi colon. For example, Male;Female for Sex field or Single;Married;Divorced;Widowed for MaritalStatus field as shown below.


1. Switch to Datasheet view and add one record to your table. On reaching to the MaritalStatus field, you should see a drop down arrow. Click the drop down arrow to select a value or option as shown below. These are the values you typed under the Row source in the Lookup tab under the Field Properties. You can go back later to add more options when the need arises.
2. Save your table by pressing Ctrl + S.
METHOD 2 (From an existing table)
This method is more professional and advantageous than method 1. It is used in a situation where by the values or list need to be updated periodically. It is created from an existing table which contains the values or list needed in the combo box.
For example in a database that contains the records of a school, if combo box is applied in the field RegNumber, and you need to add a new student data to the database, Method 1 can’t be applied. To apply combo box to a field in your table from an existing table:
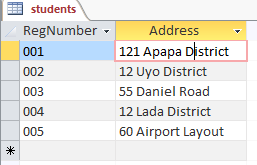
1. Create the first table, save it and switch to design view and then add two fields. For this example, I created a table called students with two fields namely RegNumber and Address.
2. Switch the students table back to datasheet view and add about five records as shown below.
3. Create the second table, save it and switch to design view and then add one field. For this example, I created a second table called students_records with one field RegNumber.
4. From the design view of the students_records table, select the field RegNumber.
5. Click the Lookup tab under field properties.
6. Select combo box from Display Control property drop down menu by clicking the drop down arrow at the extreme right.
7. Select Table/Query from Row source type property drop down menu by clicking the drop down arrow at the extreme right.
8. In the Row source, select the data source table. In our case, we select the students table.
9. In the Bound Column text box, type the column number of the field containing the data in the data source table. In our case, we type 1 because it is the first column of the table.
10. In the Column Count Text box, type the number of counts to get to the column number. In our case, we type 1.
11. Save your work and switch to Datasheet view and add one record to your table. You should see a drop down arrow on RegNumber field. Click the drop down arrow to select a value or option as shown below. These values are sourced from the RegNumber field of the students table.
LIST BOX
It resembles the combo box but differs because it does not drop down its option list. On a form, it presents them in a box, marking the selected option with a bar.To create a list box in a field of your table:
1. Create a table and switch to the design view. You may wish to use one of the tables we previously created.2. Select the field you wish to assign list box.
3. Click the Lookup tab under field properties.
4. Select List box from Display control property drop down menu.
5. Select Value list from Row source type property drop down menu.
6. Position your cursor on Row Source text box and type the values or options you want to appear in your drop down arrow in the datasheet view of your table, separating each value or option from another with a semi colon. For example, Male;Female for Sex field or Single;Married;Divorced;Widowed for MaritalStatus field.
7. Save your work and switch back to datasheet view to see
LOGICAL YES OR NO
This is used to indicate whether a record met a criterion.it is of three formats or sets namely: True/False, Yes/No and On/Off. You just need to select the set that best suites the field. For example the set Yes/No will suite the Sex field. True, Yes and On are represented by -1 (minus one) while False, No and Off are represented by 0 (zero).When assigned or set in a field, you either type -1 for records that met the criterion or type 0 for records that did not meet the criterion in the datasheet view. The criterion is normally specified in the Caption text box under the General tab of the field properties in design view. The criteria may vary depending on the field you wish to assign the logical yes or no. For Sex field, the criterion will either be SEX (Male?) or SEX (Female?). For Marital Status field the criterion will either be MaritalStatus (Married?) or MaritalStatus (Single?).
To apply or assign the logical Yes or No to a field:
1. Create a table and switch to design view.2. Click the drop down arrow in the Field type column of the field you wish to apply the Logical Yes or No.
3. Select Yes/No from the drop down menu.
4. Click the General tab under Field Properties.
5. Select a format from the Format drop down menu. For this example, I wish to assign the logical Yes/No to the Sex field of my table. So the format that best suites this field is Yes/No set.
6. Type the criterion under the Caption text box. The criterion will either be SEX (Male?) or SEX (Female?).
7. Specify a default value for the field. For this example, we can use either Yes or No. but I will choose No.The final setting is shown below.
FIELD PROPERTIES
These are the properties of table design view that are used in manipulating a table. They can further be used to modify a table up to a standard format. Some of them include:• Default Value
• Validation Rule
• Validation Text
• Input Mask
• Required
There are others like Field Size, Format, Caption, IME Mode, Text Align, etc. I will explain the first five I listed one by one with illustrations.
DEFAULT VALUE
This field property is used to automatically generate the current date and time of your computer. This means you can apply this feature in any date or time field of your table. When entering records in a table, on reaching the field Access generates the system date or time or both based on the field and how you set it.To apply or assign default value to a field in your table:
1. Create a table or open one that you created previously and switch to design view.2. Select the field you wish to apply default value. For example, a Date or Time field.
3. Click the General tab on field properties.
4. Click the Default value text box and type the syntax =Date$() for Date fields or type =Time$() for Time fields i.e. an equality sign followed by the word Date or Time depending on the field and then followed by a dollar sign($) and finally a pair of parenthesis.
5. Save your work and switch back to datasheet view. Try adding one record to the table. You will notice that on reaching the field you assigned the default field Access generates the current system date or time.
VALIDATION RULE
It is any arithmetic expression that limits the range or type of data to be entered in a field. It is usually applied in Age fields or Score fields or State field. It works hand in hand with the Validation text. It is normally helpful when designing a form to collect data for a particular age range.When an age outside the specified age range is entered in the field, Access will pop up a warning dialogue box telling the user that the age entered is out of a range or any message you specified in the validation text. The same thing applies when applied to a Score field.
To apply or assign validation to a field:
1. Create a table or open one that you created previously and switch to design view.2. Select the field you wish to validate. For example, a Time or Age field.
3. Click the General tab under field properties.
4. Click the Validation rule text box and set the criteria or condition. For example, if we wish to validate a Score field and want to limit the range of scores entered by users between 180 to 400 both inclusive, the criteria will be >=180 and <=400. This is interpreted as “Scores from 180 to 400 both inclusive”. For a State field, the criteria might be ‘State 1’ or ‘State 2’ or ‘State 3’. Replace State 1, State 2 and State 3 with the states you want the users to enter. You can add any number of states you want. Note that I used single quote and not double.
5. Save your work and switch back to datasheet view. Try adding a score or state outside the range you specified in design view, Access will pop up a default warning alert or validation text telling you that the values you entered are prohibited by the validation rule as shown below.
This is a default validation text and it is very long. You can specify your own custom validation text which will be more specific and meaningful.
VALIDATION TEXT
This field property works hand in hand with the validation rule. This means that if the validation rule is not set, validation text is unnecessary. It is used to enter text (error message) that will display whenever the validation rule is violated.
To apply or assign validation text to a field:
1. Select the field you wish to assign validation text and make sure you have already set validation rule for that field.
2. Click the General tab under field properties.
3. Type in the validation text or error message in the Validation text.
4. Save your work and switch over to datasheet view. Try entering a value that is out of range. You will notice that MS-Access will pop up your custom validation text or error message.
INPUT MASK
This field property is used to specify the pattern or format for all data to be entered in a field. It lets you enter information into a field in a pre-defined format. It is usually applied in fields like Telephone or Phone Number, Password, Zip Code, Date, Time, etc.
For example, if you want users to enter their phone number in the format 0802-703-7573 so that Access automatically adds the hyphens, then you have to set an input mask in that field that allows for that format.
To set an input mask for a field:
1. Create a table or open one that you created previously and switch to design view.
2. Select the field you wish to apply input mask. For example, Telephone or Phone Number, Password, Zip Code, Date, Time fields.
3. Click the General tab under field properties.
4. Click the small button at the extreme right of the input mask text box.
5. Select any number format of your choice.

6. Click the Next button.
7. Try the format and click the Next button.
8. Access asks you how you want to store the data. The first one is recommended but you may also wish to select the second option. Make your choice and click the Next button again.
9. Click the finish button. Save your work and switch back to datasheet view. Try entering data in that field.
REQUIRED
This field property is used to restrict a field from having a null value. This means that data must be stored in that field before you can go another field. It is usually applied to fields that store very important data like Email.
To make a field required:
1. Create a table or open one that you created previously and switch to design view.
2. Select the field you wish to make required. For example, Email.
3. Click the General tab under field properties.
4. Click the drop down arrow in the Require text box and select Yes.
5. Save your work and switch back to datasheet view. Enter a record and try leaving that field empty.
DATA TYPE
This is one of the properties of table design view that determines the type of data that could be stored in a particular field. Each field can store data consisting of only one data type which it was specified to store. For example, a Surname field should store text data.
The valid data types in Microsoft Access databases are Short Text, Long Text, Number, Date/Time, Currency, AutoNumber, Yes/No, OLE Object, Hyperlink, and Attachment. Calculated and Lookup Wizard are two special data types that are also valid.
• Short Text stores up to 255 characters of text, numbers, and symbols. Design and Create Tables to Store Data 9.
• Long Text stores up to 63,999 characters of text, numbers, and symbols.
• Number stores numbers that are used in mathematical calculations. You should not use this type to store data such as zip codes because zip code data are not used for mathematical calculations. Instead, use a Short Text data type for zip code fields and any other fields that have numbers in them but are not used in mathematical calculations (Social Security number, phone number, student person number, etc.).
• Date/Time stores dates and times.
• Currency stores currency values up to four decimal places.
• AutoNumber automatically assigns a unique number to each record. This assignment can be done sequentially or randomly.
• Yes/No stores any binary representation of data such as Yes or No, True or False, or On or Off. A field with this data type appears as a checkbox in the Datasheet view.
• OLE Object stores or links to an object such as a Microsoft Word document, an image file, or a Microsoft Excel spreadsheet. It is recommended that you use the new Attachment data type instead of the OLE Object data type.
• Hyperlink stores website addresses, email addresses, and hyperlink data.
• Attachment stores various file formats in the database with the option of editing files within the database.
• Calculated is a special data type in Microsoft Access. It is used to display results of calculations or expressions based on other fields in the table. The results of a calculated field are read-only.
• Lookup Wizard is technically not a data type, but it does appear in the data type list because it easily enables you to create a drop-down list (combo box) of values that the user can select from in the table. This list of values can be typed in manually or dynamically based on another table in the database. This feature makes data entry easier for the end user and can help eliminate bad data from being entered into the database.
This is the end of part one. I hope you learnt a lot? Feel free to share this tutorial with your friends.
In the part two of this chapter, I will be talking on TABLE OPERATIONS AND RELATIONSHIPS/JOINS (CHAPTER 2: PART 2) INTRODUCTION. See you there.


 Apk + Obb Data File")
, Median & Mode in Excel")


thanks a lot
ReplyDelete