
Forms are very important when designing practical and functional applications in Microsoft Access because they enable you to easily gather data your customers or visitors input.
INTRODUCTION TO FORM, AN OBJECT OF ACCESS DATABASE
Form is one of the objects of a database that is used to
enter, edit, view tables, and query data. It is also used to perform
calculations. The field that holds the calculation is called the Calculation Field. On a form, each
field has its own text box.


Forms are based on tables or queries, and they are used for
entering data into the database in a user-friendly manner. They are also used
for displaying data to the end user and can be used to create a menu system for
the database.
This chapter’s tutorial is split into 3 parts. This is the
part 1.
In this part, I will explicitly explain all the operations of data forms and some powerful built in functions in MS Access 2013 and 2016. Also see the full tutorial course content of this Microsoft Access Tutorial Series.
In this part, I will explicitly explain all the operations of data forms and some powerful built in functions in MS Access 2013 and 2016. Also see the full tutorial course content of this Microsoft Access Tutorial Series.
USES OF A FORM
Here are some basic uses of a form in MS-Access:
1. Forms are mainly used for three things: editing data, viewing data, and creating a menu system. But in this chapter we will focus on how we use forms to facilitate entering data and viewing database data. Without forms, you would have to enter data directly into tables, which is usually more difficult.
2. Forms used for entering data and viewing data are built directly from tables or queries and provide a custom way to view, interact, edit, add, and delete the data in real time. It is important to understand that there is a direct “connection” between the form data and the table data. Any change you make to data on the form is actually modifying the table data at the same time.
BASIC PRINCIPLES IN BUILDING A FUNCTIONAL FORM IN MS ACCESS
Here are some basic user interface design principles to keep in mind when designing and building forms:
• Forms should have a consistent look and feel.
• Text on forms should be easy to read.
• Forms should be pleasant to look at and easy on the eyes.
• Functionally, forms should display all relevant information in a logical fashion.
• Forms should employ intuitive and consistent navigation.
• The layout and design of forms should reflect the way the end user works with the form data.
TIP:
To save time when building forms, the primary challenge is to make sure it works! Once the form is working properly, you can make necessary adjustments to the design. I suggest this method because you can waste a lot of time struggling with your form design just to discover later that it is not functional.
SOME BASIC TYPES OF FORMS IN MS-ACCESS
While considering how the end user will be working with the data, you also have to decide what type of form to create. There are four basic types of forms in MS-Access. They are:
1. Basic Forms:
They display one record of data on a form at a time.
2. Multiple Item Forms:
display multiple records of data at the same time. These are also referred to as Continuous Forms.
3. Datasheet Forms:
They display the data records in a datasheet view making the form look and function exactly like a table.
4. Split Forms:
They are like a combination of a Basic Form and a Multiple Item Form all wrapped into one big form. On a Split Form, you can view a single record in its entirety and also view multiple detailed records of data at the same time. Split Forms are so named because you can view and interact with the data in two ways simultaneously.
NOTE:
In a Microsoft Access database, you can choose to build a combination of Basic Forms, Multiple Item Forms, Datasheet Forms, Split Forms. Basic Forms, Datasheet Forms, Multiple Item Forms, and Split Forms are fundamentally the same to work with and build, except they allow you to interact with the table data in different ways.
VARIOUS COMPONENTS OF A DESIGN VIEW FORM WINDOW
The diagram below shows the various components of a form window.
 |
Form Design View Window
|
1. THE VIEW BUTTONS
This button allows you to switch from one view to another, such as form datasheet view to form view.
2. THE FORM DESIGN TOOLS
These are the tools used to manipulate and design forms in MS-Access. These tools are contained in three tabs that appear only on form designs. These tabs are:
• The design tab: This tab contains the toolbox and groups used to add controls such as textboxes and labels.
• The Arrange tab: This tab contains groups and commands used to put form controls in order.
• The Format tab: This tab is used to change the font style, font size, align text, change border or line width, apply colours or special effects, etc.
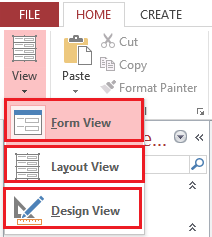
THE DIFFERENT VIEWS OF A FORM
Once the form is created, it can be viewed in three main views. Each view has its distinct purpose, advantages, and disadvantages, which are summarized below. While building database forms, you will often switch between these views. The three main types of views of a form in MS Access are: Form View, Layout View and the Design View.
Below are the description, advantages and dis advantages of each view:
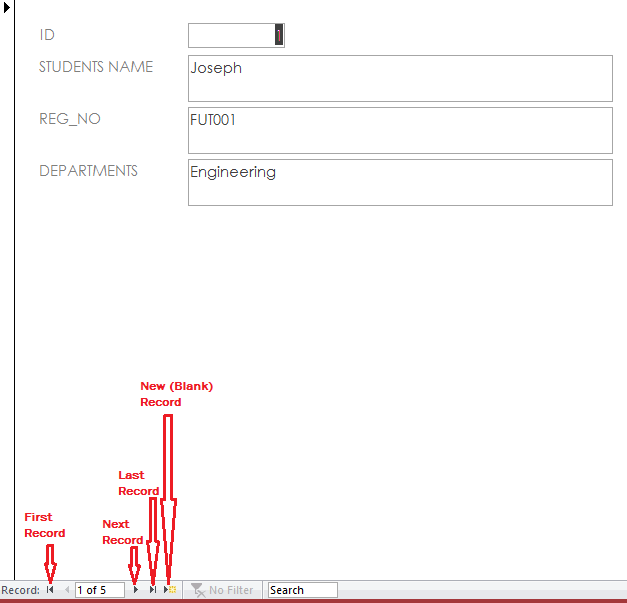
• Form View is the end-user view of the form used for entering and displaying data. You can fully update and work with the form data in this view, but you cannot make any changes to the form design or layout. This view has navigation buttons which allows you to quickly navigate between records. The figure below shows the form view with its navigation buttons.
 |
• Design View provides the most powerful way to work in the design and layout of the form. In this view, you cannot see or work with any of the form data.
• Layout View is a combination of Form View and Design View. It enables you to make most design changes to the form while viewing live form data, but you cannot update the data you are viewing. It is very powerful because it instantly allows you to see how design changes will look on the form with data.
The figure below shows the various views of a form.
 |
FORM CONTROLS
Before
diving into the details of building a form, it is important to be familiar with
a little more terminology related to forms and to understand the principle of
inheritance when building a form.
First, anything you see on a form is called a control.
This includes items such as labels, textboxes, combo boxes, option groups,
checkboxes, images, command buttons, and even graphical lines. We will explore
each of those items in detail in the Guided Exercise, but for now, it’s
important that you understand that we generically can refer to any of those
items as a control. Controls can be further classified as Bound, Unbound, or Calculated.
The form controls group is located under the Home tab.

• A bound control is bound or “connected” to a specific field in an underlying table or query. When the data in a bound control is updated, it is ultimately updating the field in the table from which the form is built. Text boxes, combo boxes, option groups, and checkboxes are some common controls that are usually bound to an underlying data source.
• An unbound control is not connected to any underlying data source in a table or query. Images, labels, and other graphics are common examples.
• A calculated control is based on a formula, function, or expression that displays a calculated result. Although calculated controls often use underlying data fields as part of the calculation, they are unable to update any data in the table like a bound control can. As the underlying fields used in the calculation are updated, the result displayed in the calculated control is also updated. The results of calculated controls are usually displayed in textboxes on a form.
NOTE:
When you build a form or add controls to a form, those controls will inherit the properties of the table fields. This is referred to as inheritance. It is a pretty simple concept, but it can get tricky when you start making changes to your tables after forms are already built.
If the field properties in the table are modified after the form is built, in some cases the form controls will not inherit the changes! For example, if a database has an existing form built from a table and you decide to make one of the fields in the table a combo box using the Lookup Wizard, the form will not automatically display that field on the form as a combo box. To ensure that control has inherited the most recent field properties from the table, you should delete the control on the form and then add it to the form again. At the time the control is added, it will inherit the field properties from the table (including the combo box) and will display automatically as a combo box on the form.
METHODS OF CREATING FORMS IN MS-ACCESS
There are three main methods of creating a form in Access. They are: Auto, Design Form and through Form Wizard.
AUTO FORM METHOD:
This is a fast and automatic method that is used to create form utilizing default designs. It helps you create a form that lets you enter information for one record at a time. Before you can a form from this method, you must first prepare the data source which can either be a table or a query.
To design a form using Auto form method:
1. Open the database where you wish to create the form.
2. From the Navigation pane located at the extreme left of Access window, click the data source you wish to use for your form. Your data source could be a table or a query.
3. Click on Form located in Forms group under Create tab as shown in the figure below.
 |
Access now creates the form sourcing data from the data source you specified earlier and opens it in layout view.
FORM DESIGN METHOD:
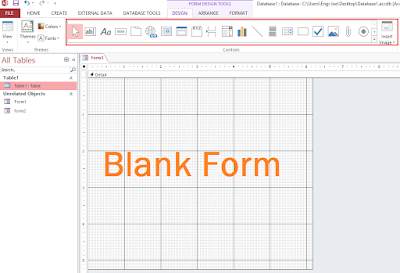
This is another method of creating form in MS Access. This method enables the user to create a form from the scratch and customizing it to the user’s taste in design view. Using this method, you can create a form without first having to specify the data source.
When you create a form using this method, you have another view type available. This vie is called Datasheet View. This view allows you to view many records at a time and these records are displayed in rows and columns.
In Design view, you can now make advance changes to the blank form such as add custom control types, writing codes and linking it to a data source.
To design a form using Design Form method:
1. Open the database where you wish to create the form.
2. Click on Form Design located in Forms group under Create tab.
3. Access now creates a blank form and opens it up in design view where you can apply your desired customization, adding your desired controls as shown below.
FORM WIZARD METHOD:
This is one of the methods of creating a form. It is a step by step procedure that is used to create a form utilizing some MS Access predesigned templates. Form wizard also allows the user to create a form using multiple tables or queries that are related.To design a form using form wizard method:
1. Click Form Wizard located in the Forms group under Create tab. Access prompts the Form Wizard dialogue box.2. Click the drop down arrow under Tables/Queries and select the data source of your form.
If you wish to use more than one table or query as your data source, select the first data source from the Tables/Queries drop down list and choose the fields needed. Then select the second data source and also choose the fields needed.
To select a field, highlight the desired field under the Available Fields option, then click the single equality sign (>). You can also select the available fields by clicking the double equality sign (>>). Click on Next as shown in the figure below.

4. Type your desired form title. Also decide whether to open the form to view and enter information or to modify the form’s design. Finally, click Finish as shown below.

FORM OPERATIONS, CUSTOMIZATIONS AND MANIPULATIONS
When you create a blank form in MS Access, you need to customize and manipulate some of its default settings, adding different control types and some codes. You also need to give the form a title and you may also want to add your own custom background.HOW TO AUTOMATICALLY CHANGE THE BACKGROUND OF THE FORM
For some reasons, you might want to change or replace the background of your form with a custom background or picture you already saved in your hard drive.To change the background of your form:
1. Open the form in design view.2. Right click anywhere within your form and put your mouse pointer to the right arrow in the Fill/Back Color option from the resulting menu.
3. Select any color of your choice as shown below.
 |
4. Access fills the entire background of your form with the colour you specified. Save your work and then switch to Form view to see the effect.
HOW TO AUTOMATICALLY GIVE YOUR FORM A HEADING OR TITLE
You might also want to give your form a heading/title that fits its purpose.
To give your form a heading/title:
1. Open the form in design view.
2. Right click anywhere within your form and click on Form Header/Footer option. Access automatically adds a header and a footer to your form.
3. Click Title located in the Header/Footer group under the Design tab. Access inserts an auto header label in the header of your form with some default title texts.
4. Click on this label, delete the default title texts and replace it with any heading of your choice as shown in the figure below.
 |
HOW TO AUTOMATICALLY INSERT YOUR COMPANY’S LOGO TO YOUR FORM
MS Access has made it easy for you to insert the logo of your company into your Form.
To insert a company’s logo into your form:
1. Open the form in design view.
2. Ensure that your form has a header. Otherwise insert one.
3. Click Logo located in the Header/Footer group under the Design tab. Access prompts the Insert Picture dialogue box. Browse to the location of the logo file, select it and click Ok as shown in the figure below.
4. Access inserts the picture file as a logo in your form very close to your title. Save your work and switch to design view to see the effect.
HOW TO AUTOMATICALLY INSERT THE CURRENT DATE AND TIME INTO YOUR FORM
You can also insert the current date and time into your form in MS Access with few clicks.
To insert the current date and time into your form:
1. Open the form in design view.
2. Ensure that your form has a header. Otherwise insert one.
3. Click Date and Time located in the Header/Footer group under the Design tab. Access prompts the Date and Time dialogue box.
4. Select any date and time format of your choice. You can also insert only date or time by unchecking the Include Date or Include Time box. Click Ok when you are through as shown in the figure below.
 |
CUSTOMIZING YOUR FORM CONROLS
When you create a new blank form and add form controls using design form method, Access gives you the option to customize the form controls to your taste. The Property Sheet Pane contains all the options you can use to customize and reset your form controls to your taste. These settings determines the functionality of your form.
THE PROPERTY SHEET PANE
This pane is normally located at the extreme right of the MS Access Form Window when opened in any other view except in Form view. It contains five tabs namely:
a. Format Tab: It contains all options you can use to format all the controls.
b. Data Tab: It helps you to specify the data sources of your form and some controls like option groups, combo box and list box.
c. Event Tab: It gives you options to customize button controls.
d. Other Tab: Contains other options not available in the other tabs above.
e. All Tab: Contains options in all the tabs above.
You also have the Selection Type drop down menu from which you can select the control you wish to customize.
The figure below shows the property sheet pane with all the tabs.
 |
RULES IN PERFORMING CALCULATIONS IN FORMS
Below are some basic rules you must obey in order to create a functional form:
1. All calculations must be done in design view of the form.
2. All calculations must begin with equality sign (=). This tells Access that you want to perform calculation.
3. All calculated fields must be enclosed in square bracket e.g. =[Quantity]*[Cost].
4. Parenthesis (()) is used when calculating with a function.
5. Ensure that the spelling of the calculated fields used in form is exactly the same with the one used in the source table/query.
6. Special characters or symbols (,.?/”) are not part of the calculated fields. Underscore sign (_) is allowed.
7. Two single inverted comma or quotation is not the same as one double inverted comma or quotation.
8. All calculations must be done inside a textbox control.
SOME POWERFUL MS ACCESS BUILT IN FUNCTIONS
MS Access built in functions are specialized, pre-defined formulas or syntaxes in MS Access which enables the user to perform calculations such as financial, statistical or mathematical calculations easily and automatically. Some of these functions include: SUM, DSUM, IIF function, etc.
Let me now explain some of these functions and show you their syntaxes.
1. SUM FUNCTION:
This function is used to calculate the total of all the numeric values in a field or column.
The syntax of SUM function is
=SUM([Expression]) then press enter key.
Where:
Expression is the field name that contains the numerical value you want to calculate.
I will explain the SUM function broadly with a practical example later in this section.
2. DSUM FUNCTION:
This function is used to calculate the total of all the numeric values in a field or column based on the specified criteria. It can be used to calculate the total of all the numeric values of an item, two or more items out of many other items in the field or column. In some cases, it can be integrated or combined with some mathematical operators (+, -, * and /).
The syntax of DSUM function is
=DSUM("[Expression])","Domain","[Criteria]='Specification'" then press enter key.
Where:
Expression refers to the field names that contains the numeric values you want to calculate.
Domain refers to the table name where the calculated field sources its data from.
Criteria refers to the field name that contains the item you want to calculate its numeric value.
Specification refers to the item you want to calculate its numeric value.
If you don’t yet understand DSUM function, don’t worry, I will elaborate it with a practical example later.
3. IIF FUNCTION:
This is a logical function or conditional statement used to evaluate a given condition. It returns the first variable if the condition is true or met, otherwise it returns the second variable if the condition is false.
The syntax of IIF function is
=IIF([Condition],“X”,”Y”) then press enter key.
Where:
X is the variable returned if the condition is true or met.
Y is the variable returned if the condition is false or not met.
There are some special cases of IIF function when one or more IIF function is enclosed in another IIF function. In this case, it is called NESTED IIF FUNCTION. It is used when there are more than one condition to specify.
For example, if you have a table containing a column for cost prices of items and another column containing the selling prices of items and you wish to determine the remarks for each product (whether you made a profit or loss or just broke even i.e. no profit no loss), then use this nested IIF function formula:
=IIF([Sales_Price]>[Cost_Price],”PROFIT”,IIF([Sales_Price]<[Cost_Price],”LOSS”,IIF([Sales_Price]=[Cost],”BROKE EVEN”]))) then press enter key.
The IIF function formula is simply telling MS Access that for each row of the table, if Sales price is greater than cost price, it should insert “PROFIT” in the Remark field, else if sales price is less than cost price, it should insert “LOSS” in the Remark field, if Sales price is equal to cost price, it should insert “BROKE EVEN” in the Remark field.
Don’t worry if you don’t understand IIF function yet, I will show you a more practical illustration.
NOTE:
The SUM, DSUM and IIF sum functions might sometimes be combined together in one syntax to solve some tactical real life problems.
This is the end of part 1 of this chapter.

Now move over to Part 2: BUSINESS APPLICATIONOF MS ACCESS BUILT IN FUNCTIONS TO SALES REPORTS AND STOCK REPORTS.
Recommended MS Access Textbook
Get this book (Kindle format): Designing Professional Database Management Systems Using Microsoft Access 2013 and 2016 and MySQL.
Click Here to know more about the book.
Now move over to Part 2: BUSINESS APPLICATIONOF MS ACCESS BUILT IN FUNCTIONS TO SALES REPORTS AND STOCK REPORTS.
Was this tutorial helpful to you?
Inform your friends about this post by clicking the share button below. Comment below if you are hooked up along the installation process.
Also click Here to subscribe for free so that you will get our latest game updates in your email.


 Apk + Obb Data File")
, Median & Mode in Excel")


No comments:
Post a Comment
WHAT'S ON YOUR MIND?
WE LOVE TO HEAR FROM YOU!