
Partitioning your hard drive can really save you a lot especially in cases of hard drive crash. In most cases, it is recommended that you partition your Pc hard drive and use the second partition as back up for some important files. In cases of Hard disk crash, you may easily recover some of your files especially if the crash affected only the boot sector of the drive. All you need to do is to connect the affected drive to a hard drive backup case, connect and access it from another good computer. Even if the crash affected the entire partition containing your. Creating a virtual hard drive saves you from such great loss. If the crash affected only the partition containing your PC Operating System, you may still be able to access the second partition and also access the files saved in it. So it is a good practice to always backup your important files in the second partition. You can also delete a previously created disk partition without formatting the hard drive.

This tutorial article will teach you how to partition your hard drive without any third party software and without formatting and also how you can delete a previously created partition without formatting.
SEE ALSO: HOW TO UNDERSTAND & CHECK YOUR PC CONFIGURATION
SEE ALSO: HOW TO UNDERSTAND & CHECK YOUR PC CONFIGURATION
How to Partition a Hard Drive in Windows OS
The procedure is the same for any version of windows OS. To partition a hard drive in Windows without formatting:
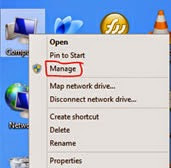
1. Right click on my computer icon on your desktop, then click on manage as shown in the screenshot below.

2. The computer management window pops up. Then click on disk management menu on the left of the window. It shows you the available disk partitions and drives on your system.

NOTE:
Make sure you know the drive letter of the disk you want to partition to avoid choosing the wrong disk.3. Right click on the disk you intend to partition and click on shrink volume option. Windows will query your drive for available shrink space and then pops up the shrink dialog box. Enter the amount of space you want to shrink in megabytes and click on shrink command.
NOTE:
Make sure the available shrink space is larger than the shrink amount you entered, else you can't complete the remaining procedures.
You will see the partition you created among the drive lists in the computer management window labeled, "Unallocated" . But you can't make use of this partition without converting it into a virtual drive.
How to Convert the Partition into a Virtual Drive
1. Right click on the newly created partition and click on New simple volume to prompt the New simple volume wizard.


Windows will prepare the virtual disk, format the disk and make it ready for use.
Hope you can now partition your hard drive in a windows pc without using any third party software
How To Delete a Previously Created Disk Partition
For some reasons you may wish to delete a partition you created earlier in windows OS. But before deleting a disk partition, make sure you have backed up your important files in that hard drive.
PROCEDURE
1. Right click on my computer icon on your desktop, then click on manage
2. The computer management window pops up. Then click on disk management menu on the left of the window. It shows you the available disk partitions and drives on your system.

NOTE: Make sure you know the drive letter of the disk partition you want to delete to avoid choosing the wrong disk partition.
3. Right click on the partition or virtual drive you wish to delete and click on Delete volume

4. Windows tells you the consequences of deleting the volume and ask you, "Do you want to continue?".Click on Yes . Windows deletes the virtual drive and displays the disk partition with the label, "Unallocated".
5. You have just succeeded in deleting the virtual drive. but then you need to merge this partition with the parent drive or partition, (the initial drive or partition from which you created the deleted virtual drive). To achieve this, Right click on the parent drive and click on extend volume.

This prompts the extend volume wizard.
6. Click on Next. The space or partition you wanted to delete should be selected
Click on Next again, and then click on finish.
You have succeeded in deleting the partition! You should also notice that the size of the parent partition or drive has increased by the size of the deleted partition.
Were you able to partition your hard drive? I will like to hear from you through the comment box.
Click the share buttons below to share this post with your friends.
Also click Here to subscribe for free so that you will get our latest tutorial article updates directly to your email.
Good Luck!


 Apk + Obb Data File")
, Median & Mode in Excel")


No comments:
Post a Comment
WHAT'S ON YOUR MIND?
WE LOVE TO HEAR FROM YOU!