
Formatting your books properly helps to improve customer or buyer experience which eventually leads to good reviews and which in turn boosts your book's sales. No buyer will value a quality content book without proper formatting and editing. There are many word editing tools you can use to format and convert your books to the various formats that amazon and Createspace accept for their kindle and paperback books. You can use tools like caliber, kindlegen, Microsoft Word, etc. to format and convert your books to these required formats. I will give you a step by step guide with screenshots on how use MS Word 2007, 2010, 2013, 2016 and later versions to edit, format, proofread, insert header and footer texts, generate table of contents automatically and convert your kindle and paperback book interiors or manuscripts from docx to htm (for kindle ebook) and pdf (for paperback) file formats which are among the accepted book interior formats.

Many Young Author ask:
- How do you make a book on Microsoft Word?
- How do I number pages in a book using Word?
- How do you print a booklet in Word?
- How do I make a booklet in Word for Mac?
Learn and Download Adobe Photoshop from Scratch and for free Here.
How to Utilize the CreateSpace Interior Templates
CreateSpace, a subsidiary of Amazon which bases specially on the printing and distribution of your book's hard copy version has designed some interior templates for the various dimensions of your book's interior which is available in two forms: Formatted Templates which makes everything simple for novices and Basic Templates for those who want a very unique interior design. This form allows you format your book's interior to your taste. View and download the various interior createspace templates for basic and formatted samples on createspace forum.For any template format you want, all you have to do is to select the template that fits your manuscript's needs and trim size. Next is to copy and paste your content into the template and then delete the former texts in the template. Lastly, cross-check and proof read each page and then convert your document to PDF format if you are preparing the interior for CreateSpace or Paperback (Amazon) publishing. Else save the document as Web page, Filtered (.htm) for Amazon kindle ebook format by clicking to File tab > Save As > Select Web Page, Filtered in the Save As Type drop down menu and then clicking on Save as shown in the screenshot below.


 2. This prompts the Table of Contents dialogue box as shown below. There are two main formats and preview: one is for paperback and print books and the other is for ebooks.
3. For paperback and print books TOC, check the Show page numbers and the Right align numbers check boxes and uncheck the Use hyperlinks instead of Page numbers check box. For ebooks, uncheck the Show page Numbers and the Right align numbers check boxes and check the Use hyperlinks instead of page numbers check box.
4. Specify the format and the number of levels to include in your Table of Content and then click OK as shown in the screenshot below.


2. Click the Bookmark icon located under the Links group. MS Word prompts the Bookmark dialogue box. Type toc in the Bookmark name field and then click the Add button as shown in the screenshot below.


Note that the converted pdf file is the one that you will upload when your book manuscript is requested during your book setup on Amazon or CreateSpace.
I wrote a full tutorial article on HOW TO CONVERT A DOCX FILE TO PDF AND OTHER FORMAT FOR FREE OFFLINE USING MS WORD.
Congrats! you have just completely formatted your interior book file or manuscript and ready to setup and upload it on Amazon or CreateSpace.
Are You Ready to Start Your Book Setup Process on Amazon or CreateSpace?

NOTE:
You will need MS Word version 2007 and later to convert your book interior from docx to htm file format.Setting Up Your Book's Interior with MS Word From Scratch
I gave you the download link to get the CreateSpace book interior template above. But if you are very familiar with Microsoft Word, you can edit, proof read, format your book interior both for kindle and paperback versions with Microsoft Word 2007 and later versions. I like formatting my book from scratch because it makes my book unique, so if you value uniqueness, then consider this method. Even if you don't have any knowledge of Word editing, I will walk you through the entire process, so don't panic! I will use MS Word 2013 for this illustration, because it has similar features with the later and previous versions of MS Word.How to Format and Edit Your Book Interior in MS Word
The processes involved in formatting and editing your book interior includes: setting up the page size and layout, inserting your book's preliminary pages, proof reading the content with the help of MS Word proof reading tool, editing your book content character styles, inserting bookmarks, setting up the page header and footer, inserting page numbers, generating the table of content automatically and finally converting your book interior or manuscript to a format that Amazon and kindle accepts.
How to Set Up Your Book Interior Page Size & Layout
Here, you will setup your book page or paper size which should be the same as your book cover. There are two major standard book sizes: the 6" by 9" (mainly for textbooks) and the 5" by 8" (mainly for non fiction novels). The default paper size and type of a Microsoft Word page is 8.5" by 11" and Letter. You will also need to modify the general page setup of your book like the page margins and page layout. Note that the interior file for the kindle ebook version of your book does not need these formatting.
To Setup Your Paperback Book Interior Page:
1. Open up your paperback book interior file or manuscript on MS Word.
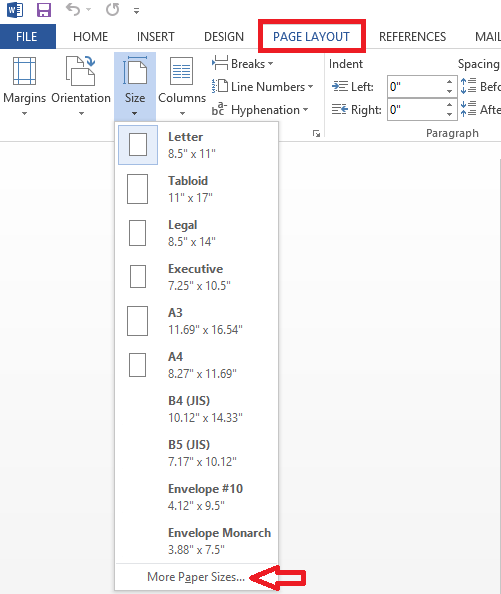
2. Click on Page Layout tab. Click on the Size drop down arrow located under the Page Setup group and then click on More Paper Sizes as shown in the screenshot below.
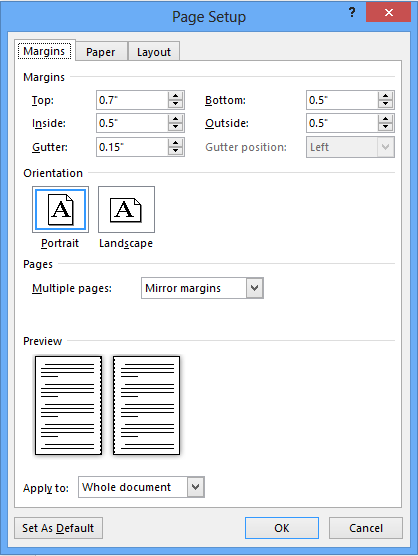
 3. This prompts the Page Setup dialogue box with three tabs: Margins, Paper and Layout.
4. Click the Margin tab. Set values for the top, bottom, inside, outside and gutter to any value of your choice. You can try 0.5" for the first four margins and 0.15" for the gutter margin. Most times, it s recommended that you make the top margin value a little bit bigger since you will add some header text in this margin. You might try 0.7".
5. Under the Orientation section, select Portrait. Under the Pages section, select Mirror margins from the Multiple Pages drop down menu. MS Word shows you the preview of your book margins in the Preview section as shown in the screenshot below.
 6. Click the Paper tab. Set values for the paper width and height under the Paper Size section. Like I said earlier, the most used standard paper sizes are
5" by 8" and 6" by 9". You can also choose any size of your choice.
7. Click the Layout tab. Select New Page from the Section Start drop down menu in the first section. Under the Header and Footer section, check the two boxes, this allows you to set two different write-ups for the odd pages and the even pages of your book. Then set values for the Header and Footer edge spacing as shown in the screenshot below. You might try 0.4" and 0.3" respectively. Set the vertical alignment to Top. Then click OK as shown below.

Some necessary preliminary pages for paperback interior and their sequence are:
2. Click on Page Layout tab. Click on the Size drop down arrow located under the Page Setup group and then click on More Paper Sizes as shown in the screenshot below.

4. Click the Margin tab. Set values for the top, bottom, inside, outside and gutter to any value of your choice. You can try 0.5" for the first four margins and 0.15" for the gutter margin. Most times, it s recommended that you make the top margin value a little bit bigger since you will add some header text in this margin. You might try 0.7".
5. Under the Orientation section, select Portrait. Under the Pages section, select Mirror margins from the Multiple Pages drop down menu. MS Word shows you the preview of your book margins in the Preview section as shown in the screenshot below.

5" by 8" and 6" by 9". You can also choose any size of your choice.
7. Click the Layout tab. Select New Page from the Section Start drop down menu in the first section. Under the Header and Footer section, check the two boxes, this allows you to set two different write-ups for the odd pages and the even pages of your book. Then set values for the Header and Footer edge spacing as shown in the screenshot below. You might try 0.4" and 0.3" respectively. Set the vertical alignment to Top. Then click OK as shown below.

Your Book's Preliminary Pages:
There are a lot of preliminary pages you can add in your kindle ebook and paperback manuscript. But the sequence for both book versions slightly differ.Some necessary preliminary pages for paperback interior and their sequence are:
- Book title and author details page
- Copyright page
- Dedication
- Preface
- Table of Contents
- Table of Contents
- Book title and author details page
- Copyright page
- Dedication
- Preface
How to Proof Read Your Book Manuscript with MS Word
It is recommended to proof read and spell-check your books before you setup and publish your book on Amazon and CreateSpace or any other book publishing platform. This helps to improve your book's user experience. Most buyers hate seeing errors in a book and even go to the extent of voicing it out when dropping a review for your book. This as a result will discourage other potential buyers from buying your book. Microsoft Word has a proof reading tool that helps you to easily proof read your books for spelling and grammatical errors.
To Proof Read Your Manuscript With MS Word:
1. Open the book manuscript in MS Word.
2. Click the Review tab and then click the Spelling & Grammar icon located under the Proofing tab. MS Word prompts the Grammar tool at the extreme right of your screen as shown in the screenshot below.

3. The tool highlights any mis-spelt word or phrase and suggests some correct words for you. You have the option to Change the word or Ignore it as shown in the screenshot above. Once you make your choice, it automatically goes over to the next word and within five minutes, you can proof-read and spell-check a manuscript with about 300 pages!
How to Create, Modify & Update Your Book Content Character & Heading Styles in MS Word
Most times, you need to modify and update the character styles of your book headings. MS Word has some default styles and setting which you might not really like to use in your book, but you can easily edit these heading styles like text type, colour, size, indentation, etc. There are different styles for title, subtitle, normal, heading 1 to heading 5, etc.
There are also different preferred text style for ebooks and paperback and print books. Some preferred character styles for ebooks are: Arial, San Serif, etc. For paperback and print books, use Garamond as this helps to reduce the number of pages which also reduces the amount Amazon and CreateSpace will charge your book's printing cost.
You can also create new styles for your book headings and body text if you wish.
To Modify and Update a Style:
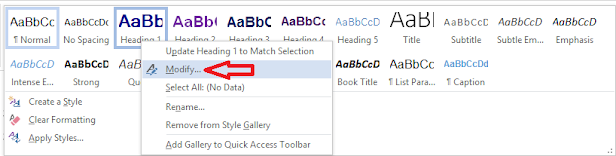
1. Click the Home tab and right click on the style you want to modify under the Styles tab. Click on Modify as shown below.

NOTE:
To format a heading based on the styles of some selected texts, select Update Heading to Match Selection as shown screenshot above.
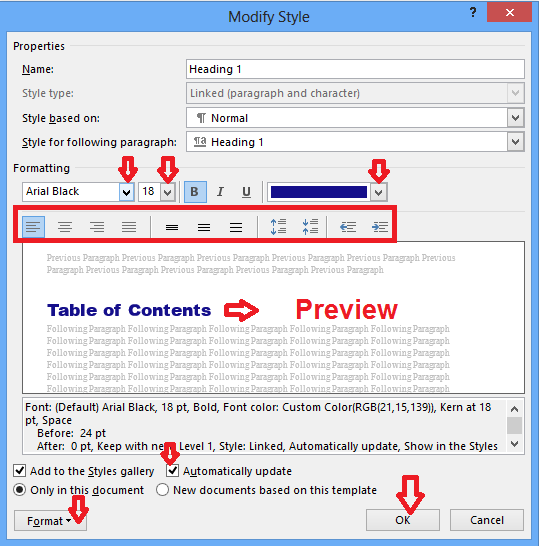
2. MS Word opens the Modify dialogue box where you can format and modify a heading style by changing the font style, size, colour, indentation, etc. You can also push the heading away from the other text or pull it closer or even centralize texts by clicking on the desired option as shown in the screenshot below. Also check the Automatically Update checkbox so that it will automatically update all texts in the manuscript formatted the chosen heading style. To further format the selected heading, click the Format button located at the extreme bottom left of the dialogue box. Click OK when you are through.
 You can repeat these steps for other heading you wish to format.

Do you wish to learn the in and out of Amazon book publishing?
Check this kindle book: How to Make Money Self-Publishing Kindle Books for Beginners.
1. Type "Table of Contents" and then click the References tab and then click the Table of Contents drop down arrow located in the Table of Contents group. You can select from the built in samples. But I prefer to create a custom TOC because it allows me set everything from scratch the way I like. So always use the Custom Table of Contents option. Click on this option located down the TOC drop down menu list as shown in the screenshot below.How to Generate a Table of Contents (TOC) Automatically in MS Word
Table of Contents is one of the most important preliminary pages of every book, both ebooks, paperback and print books because it takes reader to any desired page of your book. Most authors find it very difficult to generate a Table of Content (TOC) for their books because it requires guidelines. I walk you through on how you can generate a TOC for any version of your books automatically with Microsoft Word.
NOTE:
You need to first assign the proper heading styles to your books heading texts before you can automatically generate your book's Table of Contents.
To Generate a Table of Contents (TOC) Automatically:

3. For paperback and print books TOC, check the Show page numbers and the Right align numbers check boxes and uncheck the Use hyperlinks instead of Page numbers check box. For ebooks, uncheck the Show page Numbers and the Right align numbers check boxes and check the Use hyperlinks instead of page numbers check box.
4. Specify the format and the number of levels to include in your Table of Content and then click OK as shown in the screenshot below.

5. MS Word generates the table of contents for your book using the number of levels you specified during the setup.
The TOC for ebooks is hyperlinked and automatically takes you to the page you want as shown in the screenshot below.


To go to the link, hold down the Ctrl and then click the text link shown above.
NOTE:
If you add new contents to your book, always update the table of contents of your book. This is to ensure that the links are up to date.
To update your book's table of contents:
Click the References tab and then click the Update Table located on the Table of Contents group. Then select the option to update the entire table of content.
For paperback and print books, the table of contents is not hyperlinked but it shows you the page number of the content you are looking for as shown in the screenshot below.

How to Bookmark Your Table of Contents
For kindle ebooks, you also need to bookmark your table of contents.To bookmark your book's table of contents:
1. Highlight the "Table of Contents" and then click the Insert tab.2. Click the Bookmark icon located under the Links group. MS Word prompts the Bookmark dialogue box. Type toc in the Bookmark name field and then click the Add button as shown in the screenshot below.

How to Insert a Page Header or Footer for your book
A page header is a small write-up that appears at the top of every page of your book manuscript. It could be the book title or chapter title or even the Author name. But the most common method is to make the author name appear on every even page and then the book title or the current chapter title to appear on every odd page except on the first page of the book and the other preliminary pages. A page footer is a small write-up that appears in every page of your print book. You can set this up through the Page Set Up dialogue box as I illustrated above.
To Insert a Header/Footer to Your Paperback Interior:
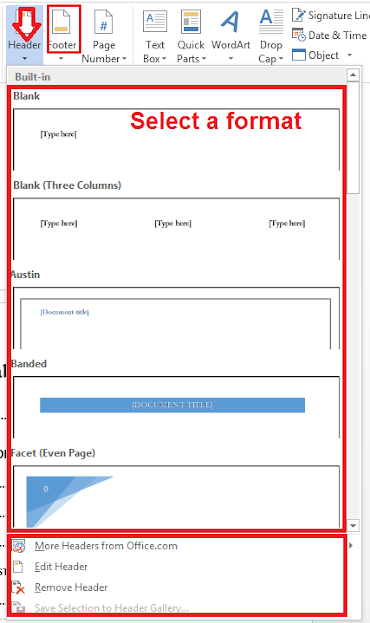
1. Click the Insert tab and then click the Header or Footer drop down arrow located under the Header & Footer group depending on your choice. To insert a footer select Footer as shown in the screenshot below.
2. Select any format of your choice from the in-built styles in the preview as shown in the screenshot below. The shortcut of achieving this step is to double click at the top most part of any odd or even page except the first page and then type in the header text for each.
 3. Type your header write-up for the odd pages and even pages separately. For footer, the same text appears both in the odd and even pages. Make sure that the Different first page, Different Odd & Even pages and the Show document text check boxes located under the Options group are all checked as shown in the screenshot below.

4. You can also adjust the header and footer margins as shown in the screenshot above.
MS Word inserts the header texts in all the odd and even pages as specified. Click Close Header & Footer button when you are through.
2. Select any format of your choice from the in-built styles in the preview as shown in the screenshot below. The shortcut of achieving this step is to double click at the top most part of any odd or even page except the first page and then type in the header text for each.


4. You can also adjust the header and footer margins as shown in the screenshot above.
MS Word inserts the header texts in all the odd and even pages as specified. Click Close Header & Footer button when you are through.
How to Insert Footer/Page Numbers to Your Books
Page numbers are very useful especially when formatting and editing a paperback or print book manuscript. Page numbers are usually added at the footer of every page apart from the preliminary pages. Some authors also choose to insert theirs in the page footer of their books.
NOTE:
If you are formatting your ebook interior or manuscript, don't number the pages because the total number of your ebook will vary when you launch it, depending on the device a buyer uses to view it. Also don't add any footer.To Insert Page Numbers to Your Paperback Interior:
1. Click the Insert tab and then click the Page Number drop down arrow located under the Header & Footer group. To insert a footer select Footer as shown in the screenshot below.
2. Hover your cursor over any of the position you want to insert the numbers to appear like: Top of page, Bottom of page, Page margins, Current position and then select any format of your choice from the styles in the preview as shown in the screenshot below.

2. Hover your cursor over any of the position you want to insert the numbers to appear like: Top of page, Bottom of page, Page margins, Current position and then select any format of your choice from the styles in the preview as shown in the screenshot below.

How to Convert Your Book Interior to Amazon eBook & Paperback Interior File Format
Here comes the final step of your book formatting process. Amazon allows different book interior file formats such as:
- Word (.doc or .docx)
- HTML (.zip, .htm, .html)
- ePub
- MOBI (.prc)
- Rich Text Format (.rtf)
- Plain Text (.txt)
- Kindle Package Format (.kpf)
For paperback and print books, Amazon and CreateSpace accept Adobe PDF (.pdf) file format for your book's interior.
With Microsoft Word, you can easily convert your ebook interior file to HTML (.zip, .htm, .html) format and also convert your paperback and print book interior file to Adobe PDF (.pdf) file format.
To Convert Your eBook Interior to ".htm" File Format:
1. Ensure that you have fully formatted and proof read your ebook interior file as described above. Then click the File tab and click Save As. Specify the save destination folder. MS Word prompts the Save As dialogue box. Type your file name and then select Web Page, Filtered in the Save As Type drop down menu and then clicking on Save as shown in the screenshot below.
2. MS Word pops up a warning dialogue telling you that some features will be discarded when converted to the htm file format. Just click OK. MS Word converts your book interior to htm file format.
3. Check the layout and arrangement of your file for the last time. You will now notice that the Table of Content links are now converted to clickable hyperlinks as shown in the screenshot below.

NOTE:
If your ebook file contains images, you will notice that MS Word has created a folder bearing the same name as the converted file name. You need to zip or compress this folder and the converted file so that you can upload them as one file.
You don't need to bother about this step if your book interior has no embedded images.
You don't need to bother about this step if your book interior has no embedded images.
To Zip Your eBook's Files in Microsoft Windows:
1. Open the location where you saved your converted book interior file. You will see the htm file and a folder containing all the images embedded in your book manuscript or interior.
2. Right click on the htm file and click Send to command from the available options. Then click the Compressed (zipped) folder option as shown in the screenshot below.

3. Just press the Enter key. You have zipped your htm file. Now drag the image folder to the zipped folder to copy the image folder into the zipped folder so that both files will be located inside the zipped folder as shown in the screenshot below.
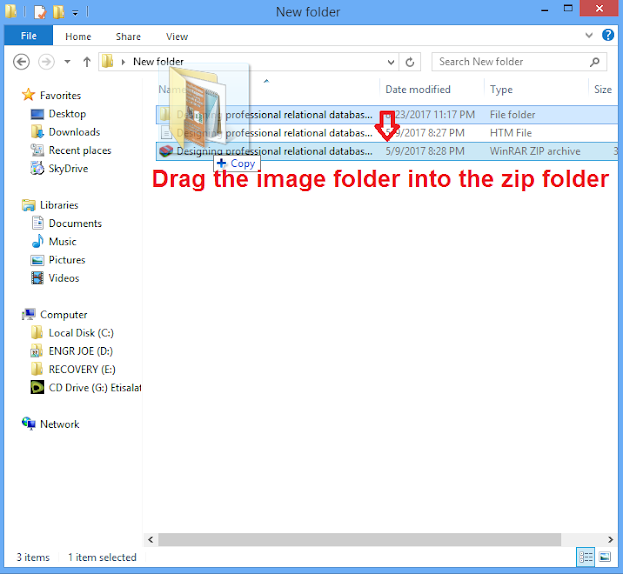 4. Now when you open the zipped folder, you will see both your htm file and the image folder. It is this zipped folder containing those files that you will upload as your manuscript when setting up your book on amazon.
2. Right click on the htm file and click Send to command from the available options. Then click the Compressed (zipped) folder option as shown in the screenshot below.

3. Just press the Enter key. You have zipped your htm file. Now drag the image folder to the zipped folder to copy the image folder into the zipped folder so that both files will be located inside the zipped folder as shown in the screenshot below.

To Convert Your Paperback & Print Book Interior to ".pdf" File Format:
1. Open the document in MS Word.
2. Click the File tab and then click Save As, This prompts the Save As dialogue box.
3. Specify the save location and type in any file name of your choice. Click the drop down menu arrow to the right of the Save as type menu and select PDF (*.pdf) from the list of the save extensions. Under the Optimize for option, check the Standard publishing online and printing check box. This option ensures that your image quality is of high resolution and very clear when printed on paper. Then click on the Save button as shown in the screenshot below.

Note that the converted pdf file is the one that you will upload when your book manuscript is requested during your book setup on Amazon or CreateSpace.
I wrote a full tutorial article on HOW TO CONVERT A DOCX FILE TO PDF AND OTHER FORMAT FOR FREE OFFLINE USING MS WORD.
Congrats! you have just completely formatted your interior book file or manuscript and ready to setup and upload it on Amazon or CreateSpace.
Are You Ready to Start Your Book Setup Process on Amazon or CreateSpace?
SEE:
- A SIMPLIFIED GUIDE TO SET UP, SELF-PUBLISH & SELL YOUR BOOKS ON AMAZON
- HOW TO SET UP, SELF-PUBLISH & SELL YOUR BOOKS ON CREATESPACE.
I know you have some suggestions or questions! I will be glad to here from you in the comment box below.
Also click Here to subscribe for free so that you will get our latest post and video updates in your email.


 Apk + Obb Data File")
, Median & Mode in Excel")


No comments:
Post a Comment
WHAT'S ON YOUR MIND?
WE LOVE TO HEAR FROM YOU!