
This is the second part of this chapter. It is recommended
that you first read part one before reading this part. If you have not read
part read part one, .Click to read Part1: Introduction to MS-Access.

In this part of the chapter, I will explain
explicitly, table operations and table relationships or joins and how to sort a
database. At the end of this chapter, I will give some practical exercises.
Please endeavor to practise those exercises as it will help you to have a deep
comprehension of table operations and relationships and database sorting.
You can download the PDF e-book file of this chapter for free and study at your convenient time. The e-book contain both parts of this chapter properly written. Click to download the e-book: Objects of a Database - Table Operations and Relationships.
You can download the PDF e-book file of this chapter for free and study at your convenient time. The e-book contain both parts of this chapter properly written. Click to download the e-book: Objects of a Database - Table Operations and Relationships.
CONTENTS
• TABLE OPERATIONS
Inserting a Field
Adjusting or Changing the Field Width
Freezing a Field
Unfreezing a Field
Hiding a Field
Unhiding a Field
• FORMATTING TABLE DATA AND FRAMEWORK
• CREATING AN ATTACHMENT FIELD OR COLUMN
• CREATING A LOOKUP FIELD OR COLUMN USING LOOKUP WIZARD
• TABLE RELATIONSHIP/JOIN
• SORTING DATA IN A DATABASE
• EXERCISE 2
• Through the datasheet view of your table.
• Through the design view of your table (normally inserted as row).
2. Select insert field. Access inserts the field. You can now change the data type if you wish.
2. Select insert row. Access inserts the field. You can now change the data type if you wish.
a. Click and drag the right edge of the field heading to your desired width. Make sure a double headed cross symbol appears before you drag.
b. It can be done automatically by double clicking the right edge of the field heading. As you do that, Access adjusts the field width to the length of the longest entry in that field.
c. Right click the desired field and select Field width. Then enter any value of your choice.
a. Click and drag the bottom edge of any row to your desired height. This will automatically adjust all the rows in that workbook. Make sure a double headed cross symbol appears before you drag.
b. Right click any row and select Row height. Then enter any value of your choice.
2. Select Freeze fields. Access freezes the field and shifts it to the extreme left.
2. Select Unfreeze all fields. Access unfreezes all frozen fields. But you will notice that the fields don’t go back to their original position. So to take it back to the original position; click and drag the field title to the original position. Make sure you see a very thick dark line before you release your mouse button.
2. Select Hide Fields. Access hides the column.
2. Select Unhide Fields. A dialogue box appears showing all the fields in the table with the hidden ones unchecked. Check the field you wish to unhide and click Close as shown below.
TABLE OPERATIONS
These are the touches or manipulations made on a table in order to make it attractive and presentable.INSERTING A FIELD
There may be a need to insert or add a new field or column between two existing fields. There are two ways to achieve this:• Through the datasheet view of your table.
• Through the design view of your table (normally inserted as row).
To insert a new field through the datasheet view of your table:
1. Right click the field whose immediate left side you want the new field to be.2. Select insert field. Access inserts the field. You can now change the data type if you wish.
To insert a new field through the design view of your table:
1. Right click the field row whose immediate top you want the new field to be.2. Select insert row. Access inserts the field. You can now change the data type if you wish.
HOW TO ADJUST OR CHANGE THE FIELD WIDTH
There are three possible ways of adjusting the field width:a. Click and drag the right edge of the field heading to your desired width. Make sure a double headed cross symbol appears before you drag.
b. It can be done automatically by double clicking the right edge of the field heading. As you do that, Access adjusts the field width to the length of the longest entry in that field.
c. Right click the desired field and select Field width. Then enter any value of your choice.
HOW TO ADJUST OR CHANGE THE ROW HEIGHT
There are two possible ways of adjusting the width height:a. Click and drag the bottom edge of any row to your desired height. This will automatically adjust all the rows in that workbook. Make sure a double headed cross symbol appears before you drag.
b. Right click any row and select Row height. Then enter any value of your choice.
HOW TO FREEZE A FIELD
Sometimes a certain row might be an object of identification for the rows of your table depending on the nature and arrangement of your table. When you freeze a column, Access moves the column to the extreme left with a thick line separating it from other fields.To freeze a field:
1. Right click the desired field.2. Select Freeze fields. Access freezes the field and shifts it to the extreme left.
HOW TO UNFREEZE A FIELD
To unfreeze a field:
1. Right click the frozen field.2. Select Unfreeze all fields. Access unfreezes all frozen fields. But you will notice that the fields don’t go back to their original position. So to take it back to the original position; click and drag the field title to the original position. Make sure you see a very thick dark line before you release your mouse button.
HIDING A FIELD
You may desire to hide a field so that it does not appear on the table datasheet view. When you hide a field, Access removes the field from the datasheet view.To hide a field:
1. Right click the field you wish to hide.2. Select Hide Fields. Access hides the column.
UNHIDING A FIELD
To unhide a field:
1. Right click any field.2. Select Unhide Fields. A dialogue box appears showing all the fields in the table with the hidden ones unchecked. Check the field you wish to unhide and click Close as shown below.

FORMATTING TABLE DATA AND FRAMEWORK
After creating a table and entering records, you may wish to format the table data to make it more attractive. There is a toolbar that contains all the tools needed to achieve that. It is called formatting toolbar. The figure below shows a formatting tool bar and its tools.HOW TO CREATE AN ATTACHMENT FIELD OR COLUMN
The attachment field or column stores various file formats in the database with the option of editing files within the database. This helps you to preview an external file without opening the file through the start button.If when entering a record, there is always a need to verify data or information in a particular file in another package, then you create an attachment for this file. One of the advantages of this data type is that you can attach any number of files in a particular record.
To create an attachment field or column:
1. Create a table and switch to design view.2. Type the field name of the column you want to create in the field name column.
3. Click the drop down arrow at the extreme right side of the Data type column and select attachment.
4. Click the General tab under Field property and type in the caption of the field in the Caption text box. This is what will appear as field heading in datasheet view. You may also wish to make the field required by selecting or typing yes in the required text box. If not leave the default value which is No.
5. Save your work and switch to datasheet view. Add a record to your table. Double inside the attachment field click to attach a file.
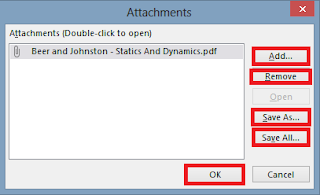
6. This calls up the attachments dialogue box as shown below. Click Add and select a file from your PC. You can add any number of file. You can also delete or preview the file. Click OK when you are through.
HOW TO CREATE A LOOKUP FIELD OR COLUMN USING LOOKUP WIZARD
A lookup field or column is a field that allows you to choose a value from another table or from a list of values. It does the same work as combo box.
To create a lookup field using the lookup wizard:
1. Create a table and switch to design view.
2. Type the field name of the field or column you want to create in the field name column.
3. Click the drop down arrow at the extreme right side of the Data type column and select lookup wizard. This prompts the lookup wizard.
4. Determine how the lookup field or column will get its values. There two options here. Select I want the lookup column to get the values from another table or query if you already have a table in which one of the fields contain the data or information you need.
This option is useful is better if there will be need to update the values frequently. When you update the values in the source table, it will reflect in the current table. Then click Next and follow the on screen instruction to finish up.
If you want to type the values yourself, select I will type in the values that I want and click Next.
5. Type the list values under col1. For example, if it is for a Marital Status column, the list values will be Married and Single. Click Next and click Finish as shown below.

TABLE RELATIONSHIP/JOIN
This is the process of linking two or more tables in order to share data between the tables. The link created between these tables allows MS-Access draw up a query from them. If there is no relationship existing between tables, it will be impossible for such operations like select query. Before a relationship can exist between tables, at least one of the join fields must have a primary.METHODS OF JOINING TABLES
There are two main methods of joining table. They include:1. One to one relationship or join
2. One to many relationship or join
ONE TO ONE RELATIONSHIP
This is one of the methods of joining tables. Here, the join fields must have primary keys (unique identifier). A value or field in the first table is equal to a table or field in the second table. This implies that the join fields must have the same data type. It is normally applied in related fields like ID fields of Sales table and that of a Stock table.To join two tables to have one to one relationship:
1. Create two tables. For example Stock and Sales tables. Make sure that at least one of the fields or columns in each of the two tables has a primary key. It is more advisable that the ID fields of the two tables have a primary key. To add a primary key to a field, right click the field in design view and select Primary key. The tables should resemble these shown below.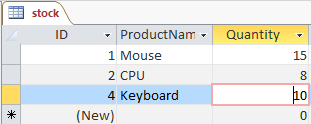
2. Close the two tables and click the Database tools tab.
3. Click the relationships icon under the relationships group. This prompts the show table dialogue box.
4. Select the first table i.e. the stock table and click Add.
5. Select the second table i.e. the sales table and click Add. Then click close.
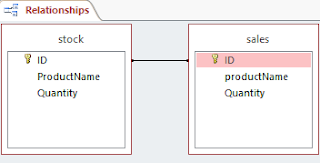
6. Click and drag the join field (field containing the primary key) i.e. the ID field in the first table i.e. the Stock table to the join field of the second table. Access links the two table by joining them with a line as shown below.
7. Click Create and click Save.
3. Click the relationships icon under the relationships group. This prompts the show table dialogue box.
4. Select the first table i.e. the stock table and click Add.
5. Select the second table i.e. the sales table and click Add. Then click close.
6. Click and drag the join field (field containing the primary key) i.e. the ID field in the first table i.e. the Stock table to the join field of the second table. Access links the two table by joining them with a line as shown below.
7. Click Create and click Save.
ONE TO MANY RELATIONSHIP
In this method, one of the join fields must not have a primary key in order to allow for data duplication. The join fields must have the same data type. Here, a record in the table whose join field has a primary key is equal to many records in the other table whose join field does not have a primary key. It is normally applied in related fields like Budget Departments and Expenditure Departments fields of Budget table and that of a Expenditure table.To join two tables to have one to many relationship:
1. Create two tables. For example, Budget and Expenditure tables. Make sure that the join field i.e. the Budget ID field of the Budget table has a primary key while that of the Expenditure (i.e. the Expenditure ID) should not have a primary key as shown below. |
|
Budget table
|

3. Click the relationships icon under the relationships group. Click Clear Layout under Tools group and then click Show table under relationships group. This prompts the show table dialogue box.
4. Select the first table i.e. the Budget table and click Add.
5. Select the second table i.e. the Expenditure table and click Add. Then click close.
6. Click and drag the join field with a primary key i.e. the BudgetID field in the first table i.e. the Budget table to the join field without primary key of the second table i.e. the Expenditure table.
7. Click on join type. This calls up the Edit Relationship dialogue box.
8. Select or check the second option which says “Include ALL records from ‘budget’ and only those from ‘expenditure’ where the joined field are equal” and click OK.
9. Check the three boxes and click on create as shown below.
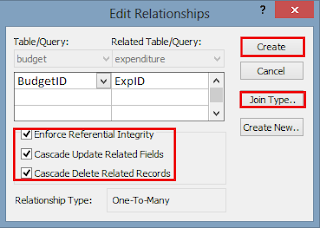
10. Access links the two table by joining them with a line as shown below.
11. Click Create and click Save and click Close. Access links the two table by joining them with a line as shown below.

SORTING DATA IN A DATABASE
This is the process of arranging database records either in ascending order or in descending order. You use a field or column to sort a table. To sort a table using a field, you right click the heading of the field and select either Sort largest to Smallest or Sort smallest to largest. In chapter four I will explain Advance methods of filtering or sorting explicitly.This is the end of this chapter. In the next chapter I will explain another object of a database called form.
Recommended MS Access Textbook
Get this book (Kindle format): Designing Professional Database Management Systems Using Microsoft Access 2013 and 2016 and MySQL.

Here are some practical exercises for you based on what we have discussed in this chapter. Endeavour to attempt them on your own.
EXERCISE FOR CHAPTER 2
1. Name any five objects of a database you know.2. Name the two major methods of creating a table.
3a. What are field properties?
b. List and explain briefly any two examples of field properties.
4. Explain data type in MS-Access and their significance in creating a table in design view.
5a. What are table operations?
b. List the procedures to achieve any three table operations of your choice.
6a. What do you understand by table join?
b. List and explain the two types of table join.
7. Create a database for Ministry of Finance, Imo states and generate twenty (20) records using the following field names:
i. Employee ID
ii. Surname
iii. First name
iv. Date of birth
v. Gender
vi. Marital status
vii. Qualification
viii. Town
ix. State
x. Phone number
xi. Email address
xii. Salary
8a. Create a database table to generate an admission list for Federal University of Technology, Owerri (FUTO).
b. Such that JAMB score should not be less than 180 and more than 400.
c. Set combo box on sex.
d. Set default value on Admission Date and Time.
e. Restrict the admission to students from the following states: Imo, Abia, Ebonyi, Anambra, Enugu and Rivers.
f. Set input mask on Date of Birth. Limit the admission to students between the age of 18 to 30 and generate fifty (50) records.
NOTE: JAMB Registration Number and Email Address are required.
9. Study the two tables below carefully and answer the questions that follow.


i.
Which type of relationship exists
between the two tables?
ii.
Will the join field of the two tables
have primary key?
iii.
Indicate the join fields in both
tables.
iv.
If one of the fields of the second
table must have a primary field, indicate the field.


 Apk + Obb Data File")
, Median & Mode in Excel")


No comments:
Post a Comment
WHAT'S ON YOUR MIND?
WE LOVE TO HEAR FROM YOU!